Why Are My Chives Turning Yellow? Causes, Fixes, and Prevention Tips

September 3, 2026
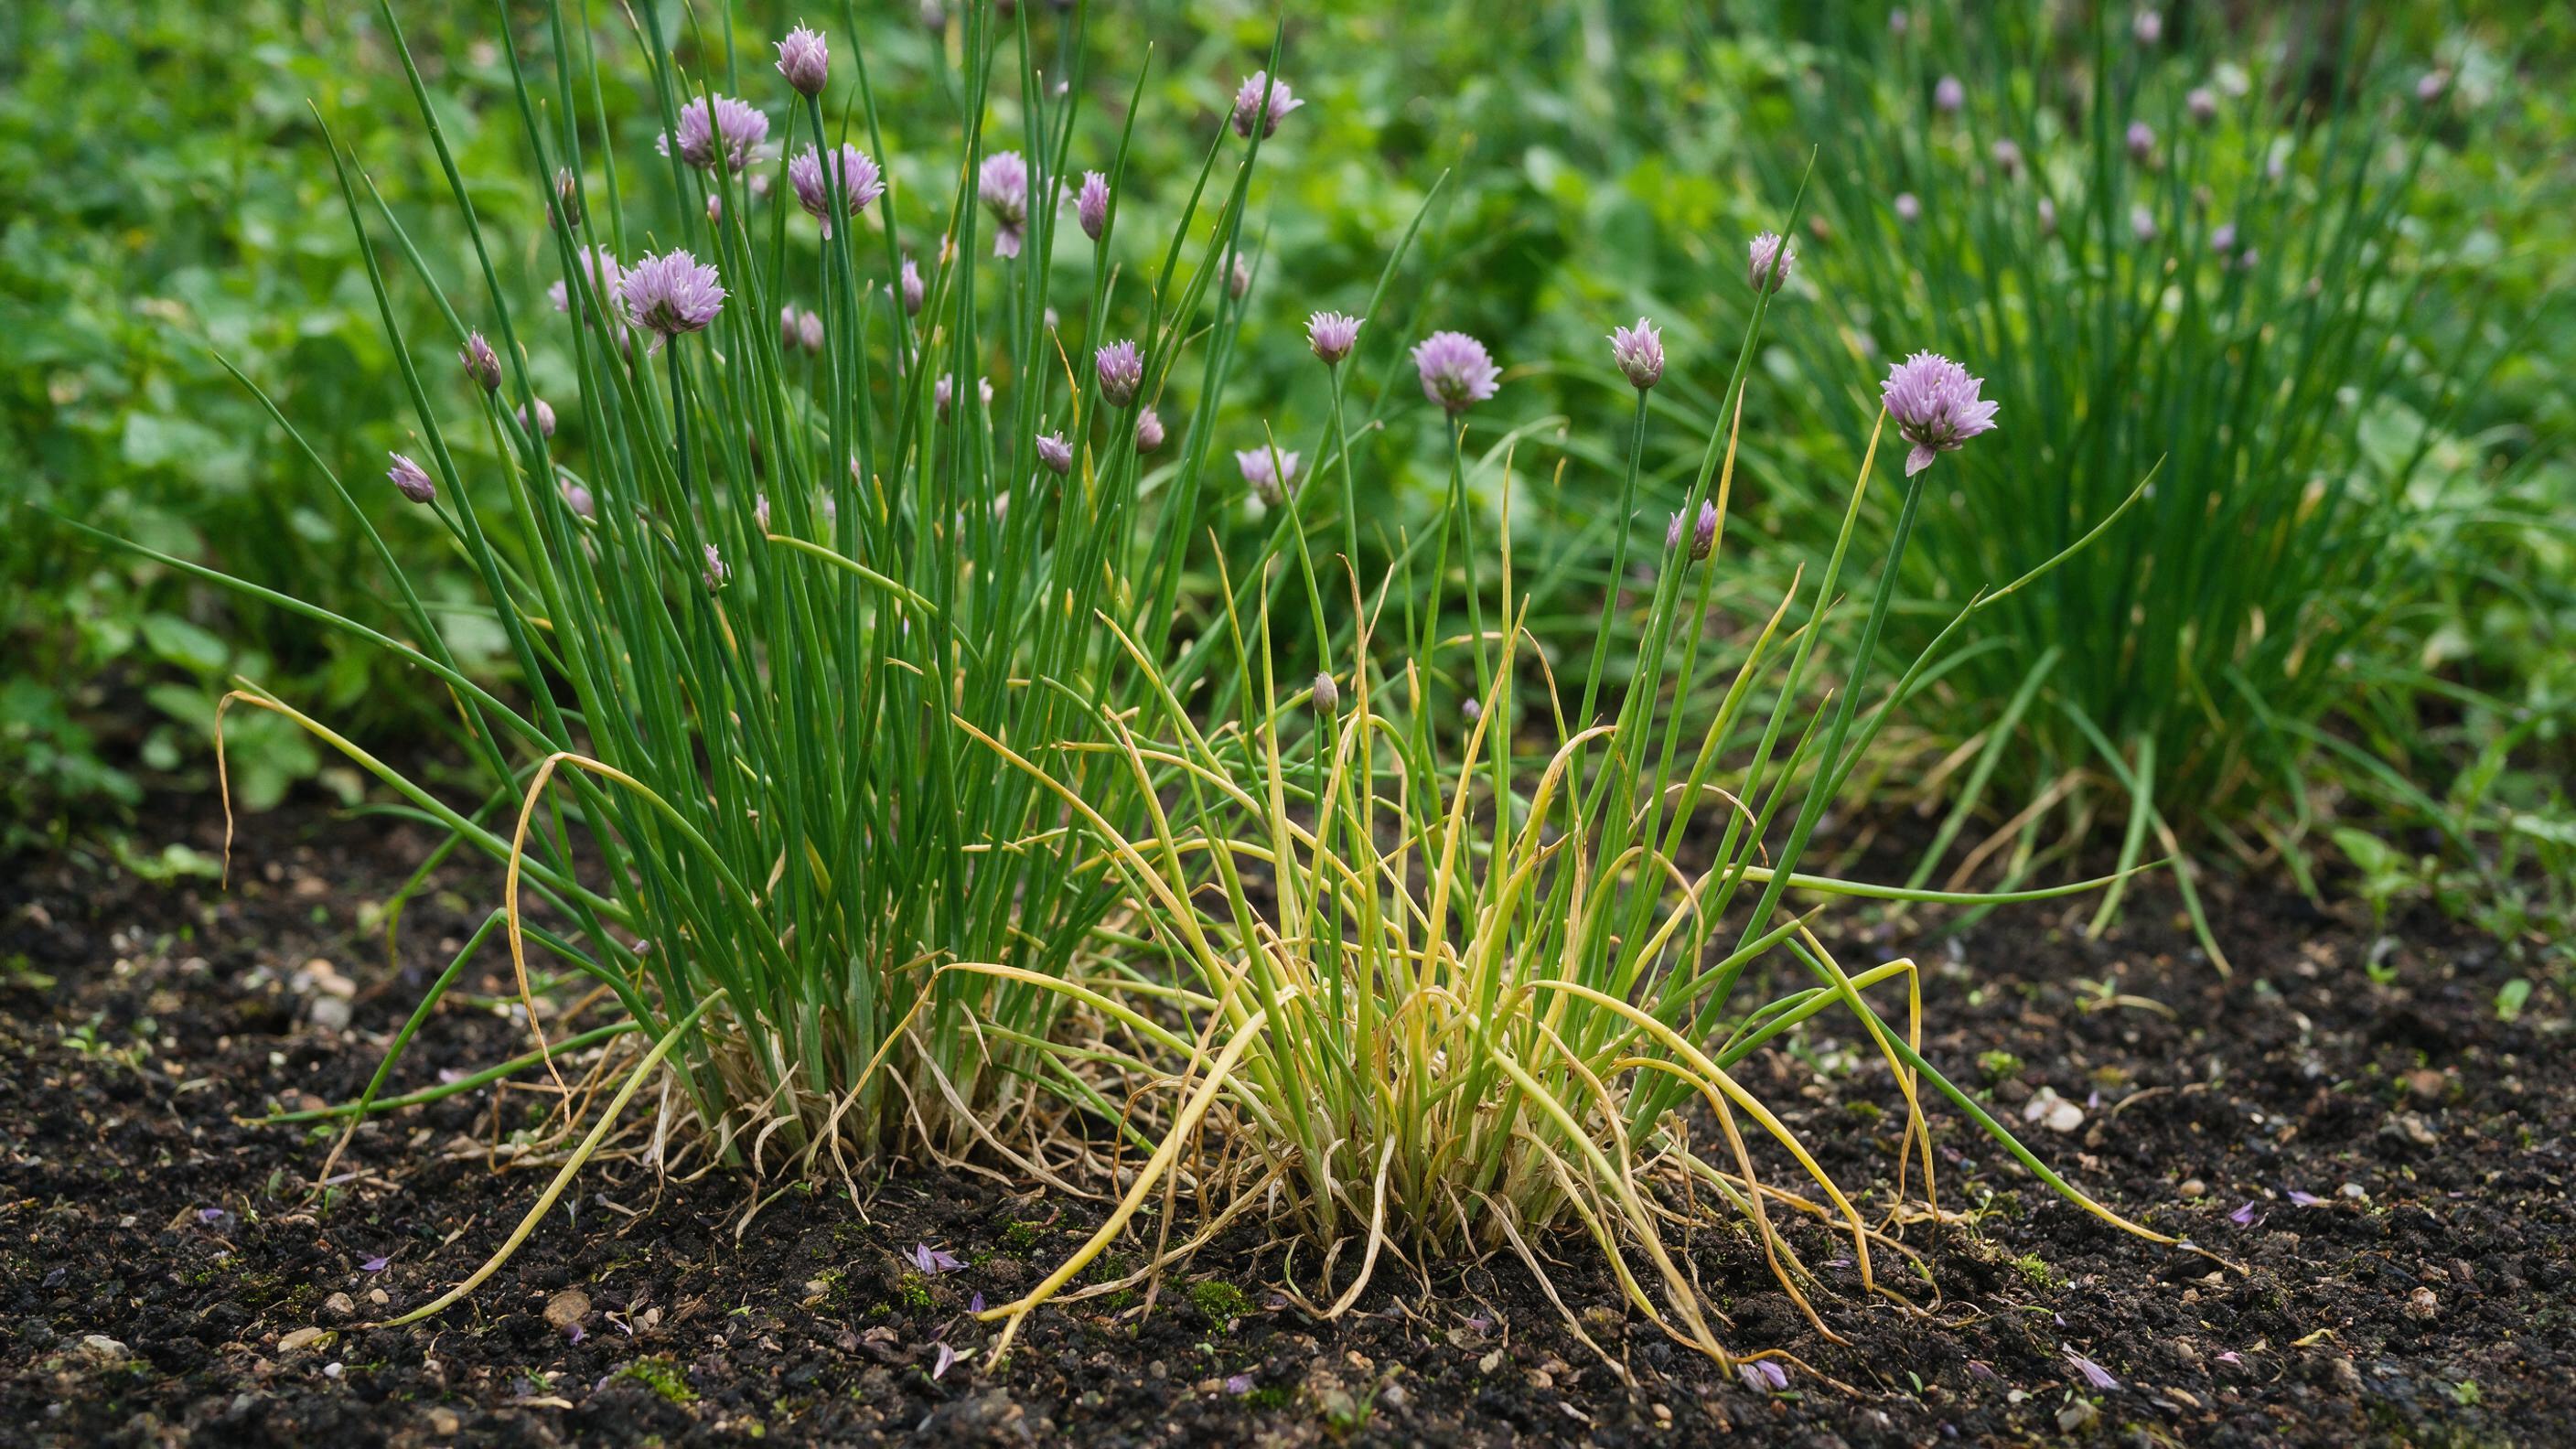
You head outside to snip a handful of fresh chives for your scrambled eggs or baked potato, and instead of that bright, grassy green, you’re greeted with limp, yellow stalks. It’s one of the more frustrating sights in a home herb garden — especially when you thought you were doing everything right.
The good news is that yellow chives are almost always fixable once you know what’s causing the problem. Chive leaves can turn yellow as a result of aging, underwatering, overwatering, insufficient light, excessive light, transplant shock, nutrient deficiencies, pest damage, or plant diseases. That’s a wide range of possibilities, but each one leaves clues you can spot with a little detective work.
This guide walks you through every major cause of yellowing chives, shows you how to diagnose what’s happening in your specific situation, and gives you practical, US-friendly solutions to get your herb patch back on track. Whether you’re growing chives in a backyard garden bed or a kitchen windowsill pot, the answers are here.
What Does It Mean When Your Chives Are Turning Yellow?
Yellowing in chives is the plant’s way of sending a distress signal — but not every yellow leaf means disaster. When you see yellowing leaves on plants, it’s easy to jump to the worst conclusion. But with chives, the reasons can be surprisingly simple, and sometimes even normal.
Chives (Allium schoenoprasum) are hardy perennials that belong to the onion family. They are prized for their delicate, onion-like flavor and are relatively easy to grow, but they do have specific nutrient requirements to maintain their green foliage. When those requirements go unmet, the leaves tell you first.
The yellowing can appear in different patterns depending on the cause. Underwatering, overwatering, insufficient light, excessive light, transplant shock, and nutrient deficiencies can all cause yellowing leaves in chives, and this generally starts from the tips before affecting the whole leaf and wilting. Pest and disease damage, by contrast, tends to show up differently.
The pattern of yellowing due to pest damage and plant diseases is much more obvious, often beginning as little yellow scars or spots on the leaves. When the problem becomes serious, the whole leaf or clump can end up discolored and dead. Knowing which pattern you’re looking at narrows down the cause quickly.
Pro Tip: Before panicking, check whether only the oldest, outermost stalks are yellow. A few aging leaves turning yellow at the base is completely normal and doesn’t require any intervention beyond a quick trim.
Is Yellowing in Chives Always a Sign of a Problem?
Not always — and understanding when yellow is normal saves you a lot of unnecessary worry. Chives will naturally start turning yellow starting from the oldest outer leaves at the end of every season, from late fall to winter. Given good growing conditions, they will thrive once again in spring.
One of the most common reasons chives turn yellow is age. As chives age, their leaves and stalks naturally begin to yellow and die off. This is a normal process and is nothing to worry about. If you haven’t harvested your chives in a while, the older outer leaves are simply completing their life cycle.
Think about the bottom leaves on a tomato plant — those older, lower leaves often yellow and fall off as the plant matures and focuses its energy on new growth. Chives can behave similarly; older leaves might naturally fade. If it’s just a few of the oldest stalks, you might not need to worry too much.
However, if the yellowing is widespread or creeping up new growth, it’s time to play detective. That’s when one of the causes below is likely at work, and the sooner you identify it, the faster your chives bounce back.
Watering Issues Causing Chives to Turn Yellow
Watering is the single most common trigger for yellow chive leaves, and both too much and too little water cause the same visible symptom. Too much water can drown the roots, leading to rot and an inability to absorb nutrients, which often manifests as yellowing. Too little water stresses the plant, and it can signal distress by turning yellow, sometimes with wilting or brown edges preceding the color change.
Signs of Overwatering
Poor drainage resulting in over-saturated soil will result in yellowing chives. Excess water in the growing medium suffocates the root system of the plant. Plants including chives can drown when given too much water than they can handle. They can’t breathe when overwatered because there is no room for oxygen to move through a saturated growing medium. As a result, they turn pale yellow and start dying.
Examine the leaves closely. A soft, mushy texture often indicates that your chives are suffering from too much water, leading to potential root rot. You may also notice the soil staying wet for days after watering, or even a faint musty smell near the roots.
Signs of Underwatering
Underwatering also causes yellowing, typically starting with dry, crispy leaf edges, so monitor how quickly the soil dries between waterings. The soil will feel bone dry an inch or two down, and the leaves will feel papery rather than soft or mushy.
The Right Watering Approach
When it comes to watering chives, consistency is key. They don’t like to be waterlogged, but they also don’t want to dry out completely. A good rule of thumb is to water when the top inch of soil feels dry to the touch.
Aim for the base of the plant to avoid encouraging fungal issues on the leaves. Chives in containers tend to dry out faster than those in the ground, so they might need more frequent attention, especially during hot spells. This is especially relevant in summer across much of the US, where temperatures can spike quickly.
Pro Tip: If you’re growing chives in a pot indoors, make sure the pot has drainage holes. If your pot doesn’t have enough drainage holes, it’s time to repot. Standing water in a saucer under the pot is just as damaging as overwatering from above.
Light Conditions Behind Chives Turning Yellow
Light is another factor that can push chives toward yellow from two opposite directions — too little and too much both cause problems.
While chives are pretty hardy, they can start to fade if they get insufficient light. On the flip side, excessive heat from too much direct sun can also stress them out. For most US gardeners, the challenge shifts by season: insufficient light in winter (especially for indoor plants) and too much harsh afternoon sun in summer.
Too Little Light
If you notice yellowing leaves, check if the plant is getting enough light. Move your chives to a brighter spot if needed. Chives grown on a north-facing windowsill or in a shaded corner of the garden often produce pale, weak growth that eventually turns yellow.
For indoor chives, a south- or east-facing window is ideal. Aim for 6–8 hours of indirect sunlight and maintain a temperature range of 60°F to 75°F (15°C to 24°C) for optimal growth. You can also use a grow light to supplement natural light during darker months.
Too Much Direct Sun
Chives can burn from too much light exposure, especially during very hot summers, and start turning yellow at the tips. As time passes, they will turn brittle and brown. With too much light, chlorophyll will also degrade and the leaves of your chives will inevitably start losing their lush green color.
For outdoor plants, consider a spot that receives morning light but is shielded during the intense afternoon sun. In states like Arizona, Texas, or Florida, this afternoon shade can make the difference between healthy green chives and scorched yellow ones.
Soil, Nutrients, and Root Health Causing Chives to Turn Yellow
Soil quality and nutrient availability are closely linked — and both directly affect leaf color. Good soil is the bedrock of healthy chives. They thrive in well-draining soil that has a neutral to slightly acidic pH (6.0–7.0). Poor soil quality can lead to nutrient deficiencies, stunting growth.
Nitrogen, Potassium, and Magnesium Deficiencies
Yellowing chive leaves are a clear sign your plant isn’t getting the nutrients it needs — especially nitrogen, which is essential for lush, green growth. If you notice the lower, older leaves turning pale or yellow while the rest of the plant appears weak, nitrogen deficiency is likely the culprit.
Different deficiencies produce different yellowing patterns, which makes them useful diagnostic clues:
- Nitrogen deficiency causes the older, lower leaves of the chives to turn yellow and wither. Nitrogen is essential for chlorophyll production, which gives plants their green color.
- Phosphorus deficiency leads to stunted growth and yellowing of the leaves, often starting from the base of the plant.
- Potassium deficiency manifests as yellowing at the tips and edges of leaves. You may also see browning or scorching along the leaf margins, indicating your chives need a nutrient boost.
- Magnesium is important for photosynthesis in chives. Without it, the chive leaves may develop yellow spots between the veins while the veins remain green. This deficiency often appears first in the older leaves.
Soil pH Problems
If your chives are looking a bit yellow and sad, the pH balance of your soil might be off. Chives prefer slightly acidic to neutral soil (pH 6.0–7.0). When the pH swings too far in either direction, it can affect nutrient availability and lead to yellowing leaves.
Soil amendments like lime to raise pH or sulfur to lower pH (depending on your soil test results) are effective at balancing soil pH. This helps create an environment where chives can access nutrients more effectively. You can pick up an inexpensive soil test kit at any US garden center or through your local cooperative extension service.
Fertilizing Correctly
When you’re confident a nutrient deficiency is the issue, choose a balanced fertilizer with slightly higher nitrogen content, like a 10-5-5 formulation. Apply it in early spring when growth starts, and again in midsummer if needed.
For organically grown chives, try top-dressing with well-rotted compost, worm castings, or a sprinkle of blood meal. These options nourish the soil without synthetic chemicals. Be careful not to over-fertilize — over-fertilizing chives will cause them to lose a lot of their flavor.
Pro Tip: A regular light application of a balanced fertilizer will help chives stay green and lush. Apply a diluted liquid fertilizer at half strength every 1–1.5 months, from spring to fall.
Environmental Stress Triggering Chives to Turn Yellow
Even when watering and nutrients are dialed in, environmental factors can still push chives toward yellow. Temperature swings, transplant shock, and poor airflow are the most common culprits in this category.
Temperature Extremes
Chives thrive in moderate temperatures, ideally between 60 and 75°F (15–24°C), so protect outdoor plants from scorching midday heat or frost. In the US, this means protecting chives from late spring frosts in northern states and from intense summer heat in southern ones.
Temperature stress can manifest as wilting, yellowing leaves, and stunted growth. If your chives’ leaves are dropping or becoming limp, they may be too hot or too cold. Potted chives have an advantage here — you can simply move them indoors when conditions get extreme.
Transplant Shock
Drastic changes in growing conditions after transplanting can shock chives and cause them to become yellow. They can die if not properly hardened off beforehand. This is especially common in spring when gardeners move seedlings started indoors directly into full outdoor conditions.
When transplanting chives, the soil temperature should ideally be between 60°F and 70°F (15–21°C). Transplanting should be done when there is no probability of frost or cold weather. Chives should be over 6–8 weeks old before they’re transplanted into your garden.
Poor Airflow
Good airflow is important to keep leaves dry and prevent fungal issues: for potted chives, avoid crowding on your windowsill, and for garden chives, leave space between plants and avoid overwatering. Dense, crowded plantings trap humidity around the leaves, which is exactly the environment fungal diseases love.
Pests and Disease Leading to Chives Turning Yellow
Pests and diseases produce some of the most visually distinct yellowing patterns on chives, and they tend to worsen quickly if you don’t catch them early.
Common Pests
If you spot tiny bugs crawling on your chive leaves or notice leaves turning yellow and distorted, pests could be the culprits. Aphids, thrips, and onion maggots are common pests that feed on chive plants, causing stress and yellowing leaves.
Here’s what to look for with each pest:
- Aphids: Aphids are notorious for leaving a sticky residue and curling leaves. Check the undersides of leaves and near new growth.
- Spider mites: If you see specks, webbing, or sticky residue, spider mites may have moved in. They thrive in hot, dry conditions common in US summers.
- Thrips: Thrips appear as tiny black dots (approximately 1 mm in size) on the leaves of your chives.
- Onion flies: Onion flies can wreak havoc, causing wilting and yellowing leaves while leaving larvae in the soil.
You can use plant identification apps to help confirm what you’re looking at before treating. For treatment, insecticidal soaps or horticultural oils like neem oil are your go-to options. They’re effective and environmentally friendly.
Fungal and Bacterial Diseases
If you notice yellow spots or patches on your chive leaves, especially during damp or humid weather, fungal infections might be to blame. Fungi love moist conditions and can quickly spread if not addressed, causing yellowing and weakening of the plant.
The most common diseases affecting chives in the US include:
- Botrytis blight (gray mold): One of the most common fungal diseases affecting chives. Brown spots appear on the leaves first, eventually turning gray as the fungus releases spores when the plant is touched. Botrytis blight is caused by Botrytis cinerea, a fungus that thrives in high-humidity conditions.
- Bacterial leaf spot: Shows up as dark, water-soaked spots that turn yellow over time. These spots eventually merge and cause entire leaves to die, often leading to complete plant loss.
- Rust and powdery mildew: Common fungal diseases that can affect chives include botrytis blight, rust, and powdery mildew.
To control bacterial infections, avoid overhead watering to reduce leaf wetness, ensure good air circulation around the plants, and remove and discard any infected plants immediately.
Viral Infections
When your chive plants show stunted growth, distorted leaves, and yellowing that doesn’t seem to improve with standard care, viral infections might be at play. Viruses can weaken plants and reduce their ability to absorb nutrients, leading to persistent yellowing and poor growth. Unfortunately, there’s no cure for viral infections in plants.
Removing infected chive plants may halt the spread of the virus, but any already affected plants will likely continue to show symptoms. New plantings in the same area should be monitored closely for signs of infection.
How to Diagnose Why Your Chives Are Turning Yellow
The fastest way to fix yellow chives is to work through a quick, systematic diagnosis rather than guessing and applying random treatments. When your plant’s leaves start turning yellow, taking a systematic approach can make diagnosis easier. Start by checking the soil moisture. Overwatering is a common culprit since wet roots can’t absorb oxygen, leading to yellow, wilting leaves. Let the soil dry slightly before watering again, and always use pots with drainage holes.
Work through these steps in order:
- Check soil moisture first. Use your finger to probe the soil or a moisture meter to gauge its dampness. Wet and soggy points to overwatering; bone dry points to underwatering.
- Look at where the yellow starts. Yellow at the base or older outer leaves suggests aging or nitrogen deficiency. Yellow tips suggest potassium deficiency or sun scorch. Yellow spots or patches suggest pests or fungal disease.
- Inspect the leaves up close. Inspecting your chives for pests is important in diagnosing yellow leaves. Look carefully at the undersides of the leaves, where pests often hide.
- Assess growth patterns. Assess the overall growth patterns of your chives. Stunted growth can signal that your plants aren’t getting the nutrients they need to thrive.
- Test your soil. A soil test can reveal what’s missing, so you can tailor your fertilizer accordingly. Many US cooperative extension offices offer low-cost or free soil testing.
- Consider recent changes. Did you recently transplant, repot, move the plant, or change your watering schedule? If you’ve recently transplanted your chives, the stress of the move can cause the plant to experience temporary yellowing or wilting as it adjusts to its new environment.
Key Insight: The texture of the yellow leaves is one of the fastest clues. Soft and mushy = overwatering. Dry and papery = underwatering or sun scorch. Spotted or streaked = pest or disease.
How to Fix Chives That Are Turning Yellow
Once you’ve identified the cause, the fix is usually straightforward. Here’s what to do for each scenario.
Fix Watering Problems
When the soil stays too wet for too long, it can suffocate the roots and prevent them from getting the oxygen they need to thrive. Allowing the soil to dry out slightly between waterings is key. This helps prevent waterlogged conditions that can lead to root rot and yellowing leaves.
If root rot has already set in, remove the plant from the pot, inspect the roots, and trim any affected areas. Repot in fresh, well-draining soil to give your chives a fighting chance. Add perlite or coarse sand to improve drainage going forward.
Fix Light Issues
For chives getting too little light, move them to a brighter spot or add a grow light. For chives getting too much harsh sun, use sheer curtains to diffuse harsh sunlight. This way, your chives can enjoy the light without the burn. Outdoor plants can be shaded with a simple row cover or shade cloth during peak summer heat.
Fix Nutrient Deficiencies
Choose a balanced fertilizer with slightly higher nitrogen content, like a 10-5-5 formulation. Apply it in early spring when growth starts, and again in midsummer if needed. For magnesium deficiency, use Epsom salts (magnesium sulfate) diluted in water to provide magnesium. Apply the solution directly to the soil or as a foliar spray.
Fix Pest Infestations
Insecticidal soap and neem oil work by suffocating and repelling pests while being safe for beneficial insects. This helps restore chive health and prevent future infestations. You should see a reduction in pest activity within a few days to a week after treatment. Chive leaves may begin to recover their healthy green color as new growth emerges.
You can also explore companion plants that help deter insects naturally. Many US gardeners also use companion planting strategies in their herb and vegetable gardens to reduce pest pressure overall.
Fix Fungal Disease
Fungicides contain active ingredients that target fungal pathogens, stopping their growth and protecting plants from further damage. This helps chives recover and regain their healthy green color. These treatments also help eliminate fungal spores and protect new growth from infection. Improvement should be visible within a few weeks as new growth appears healthy. Existing yellowed leaves may not recover fully but should stop spreading.
Trim Yellow Leaves
Regardless of the cause, sometimes the yellowing is just a sign of aging. Trim off the yellow leaves to encourage new growth. Removing damaged foliage also reduces the chance of disease spreading and encourages the plant to put energy into fresh, green shoots. You can explore more types of plants to grow alongside your chives for a more resilient garden.
How to Prevent Chives From Turning Yellow Going Forward
Prevention is far easier than treatment, and a few consistent habits will keep your chives green and productive through the entire growing season.
| Preventive Action | What It Prevents | How Often |
|---|---|---|
| Check soil moisture before watering | Overwatering and root rot | Every watering session |
| Apply balanced fertilizer at half strength | Nutrient deficiencies | Every 4–6 weeks, spring to fall |
| Inspect leaves for pests | Aphid, thrip, and spider mite damage | Weekly |
| Trim yellow or dead leaves | Disease spread and poor airflow | As needed |
| Divide clumps every 2–3 years | Overcrowding and nutrient competition | Every 2–3 years in spring |
| Soil test before planting or each spring | pH imbalance and hidden deficiencies | Once per year |
| Refresh potting mix for container chives | Soil exhaustion and compaction | Yearly |
Regular preventive care is the secret to vigorous growth: divide overgrown clumps every two or three years to prevent competition for resources. Trim leaves often, even if you’re not cooking with them — this encourages new shoots.
Water chives deeply but infrequently, allowing the soil to dry slightly between waterings to prevent waterlogged conditions. Plant chives in well-draining soil or containers with good drainage to avoid root rot and fungal infections.
Don’t forget about air circulation. Poor airflow can lead to high humidity and make it easier for diseases to spread. In humid parts of the US like the Southeast, this is one of the most overlooked prevention strategies for herb gardeners.
If you’re growing chives indoors and struggling with consistent care, plant care apps for Android or plant identification apps for iPhone can send watering reminders and help you spot problems early.
Important Note: Harvesting your chives regularly is one of the best preventive measures you can take. It is recommended to regularly harvest chives to encourage new growth and keep the plant healthy. Even if you don’t need them for cooking, snip the leaves back to about 2 inches from the base every few weeks.
FAQ
Can I Still Eat Yellow Chives?
Yes, you can still eat chives if the leaves are yellow. However, the flavor may not be as strong as it would be with healthy green leaves. If the yellowing is due to a fungal disease or pest infestation, it’s better to discard those leaves and treat the plant before harvesting again.
Why Are My Chives Turning Yellow at the Base Specifically?
Yellowing at the base most often points to overwatering, root rot, or nitrogen deficiency. Chives thrive in well-draining soil, and excessive moisture can lead to root rot and other issues that can cause the plant to turn yellow at the base. Waterlogged soil deprives the roots of oxygen, which can stress the plant and result in yellowing foliage. Check your drainage first, then assess your fertilizing routine.
How Long Does It Take for Chives to Recover After Turning Yellow?
Recovery time depends on the cause. It may take a week or two for the plants to show improvement after fixing a watering issue. Nutrient corrections take a bit longer — it may take a few weeks for soil pH adjustments to take effect and for chives to show improvement. New growth should start to appear healthier and greener as the pH balance stabilizes.
Should I Cut Off Yellow Chive Leaves?
Yes. Removing yellow leaves is always a good idea regardless of the cause. It improves airflow, reduces disease risk, and redirects the plant’s energy toward producing fresh, green growth. Use clean scissors and cut the stalks down to about 1–2 inches from the soil level.
Why Are My Indoor Chives Turning Yellow?
Indoor chives most commonly turn yellow due to insufficient light, overwatering, or low humidity during winter months when heating systems dry out the air. If growing indoors, position the plant near a window where it can get plenty of light without being exposed to harsh rays. A south-facing window works best for most US homes. If natural light is limited, consider moving your chives to a spot highlighted in our guide to best houseplants for low-light areas and supplementing with a small grow light.
Can Chives Recover from Root Rot?
Yes, if caught early. Remove the plant from its pot, trim away any black or mushy roots with sterile scissors, and repot into fresh, well-draining soil. Reduce watering frequency going forward and ensure the new pot has adequate drainage holes. Severe root rot that has spread throughout the root system is usually fatal to the plant, and starting fresh with new seeds or divisions is the better option.