Why Are My Spider Plant Tips Brown? Causes, Fixes, and Prevention

October 1, 2026
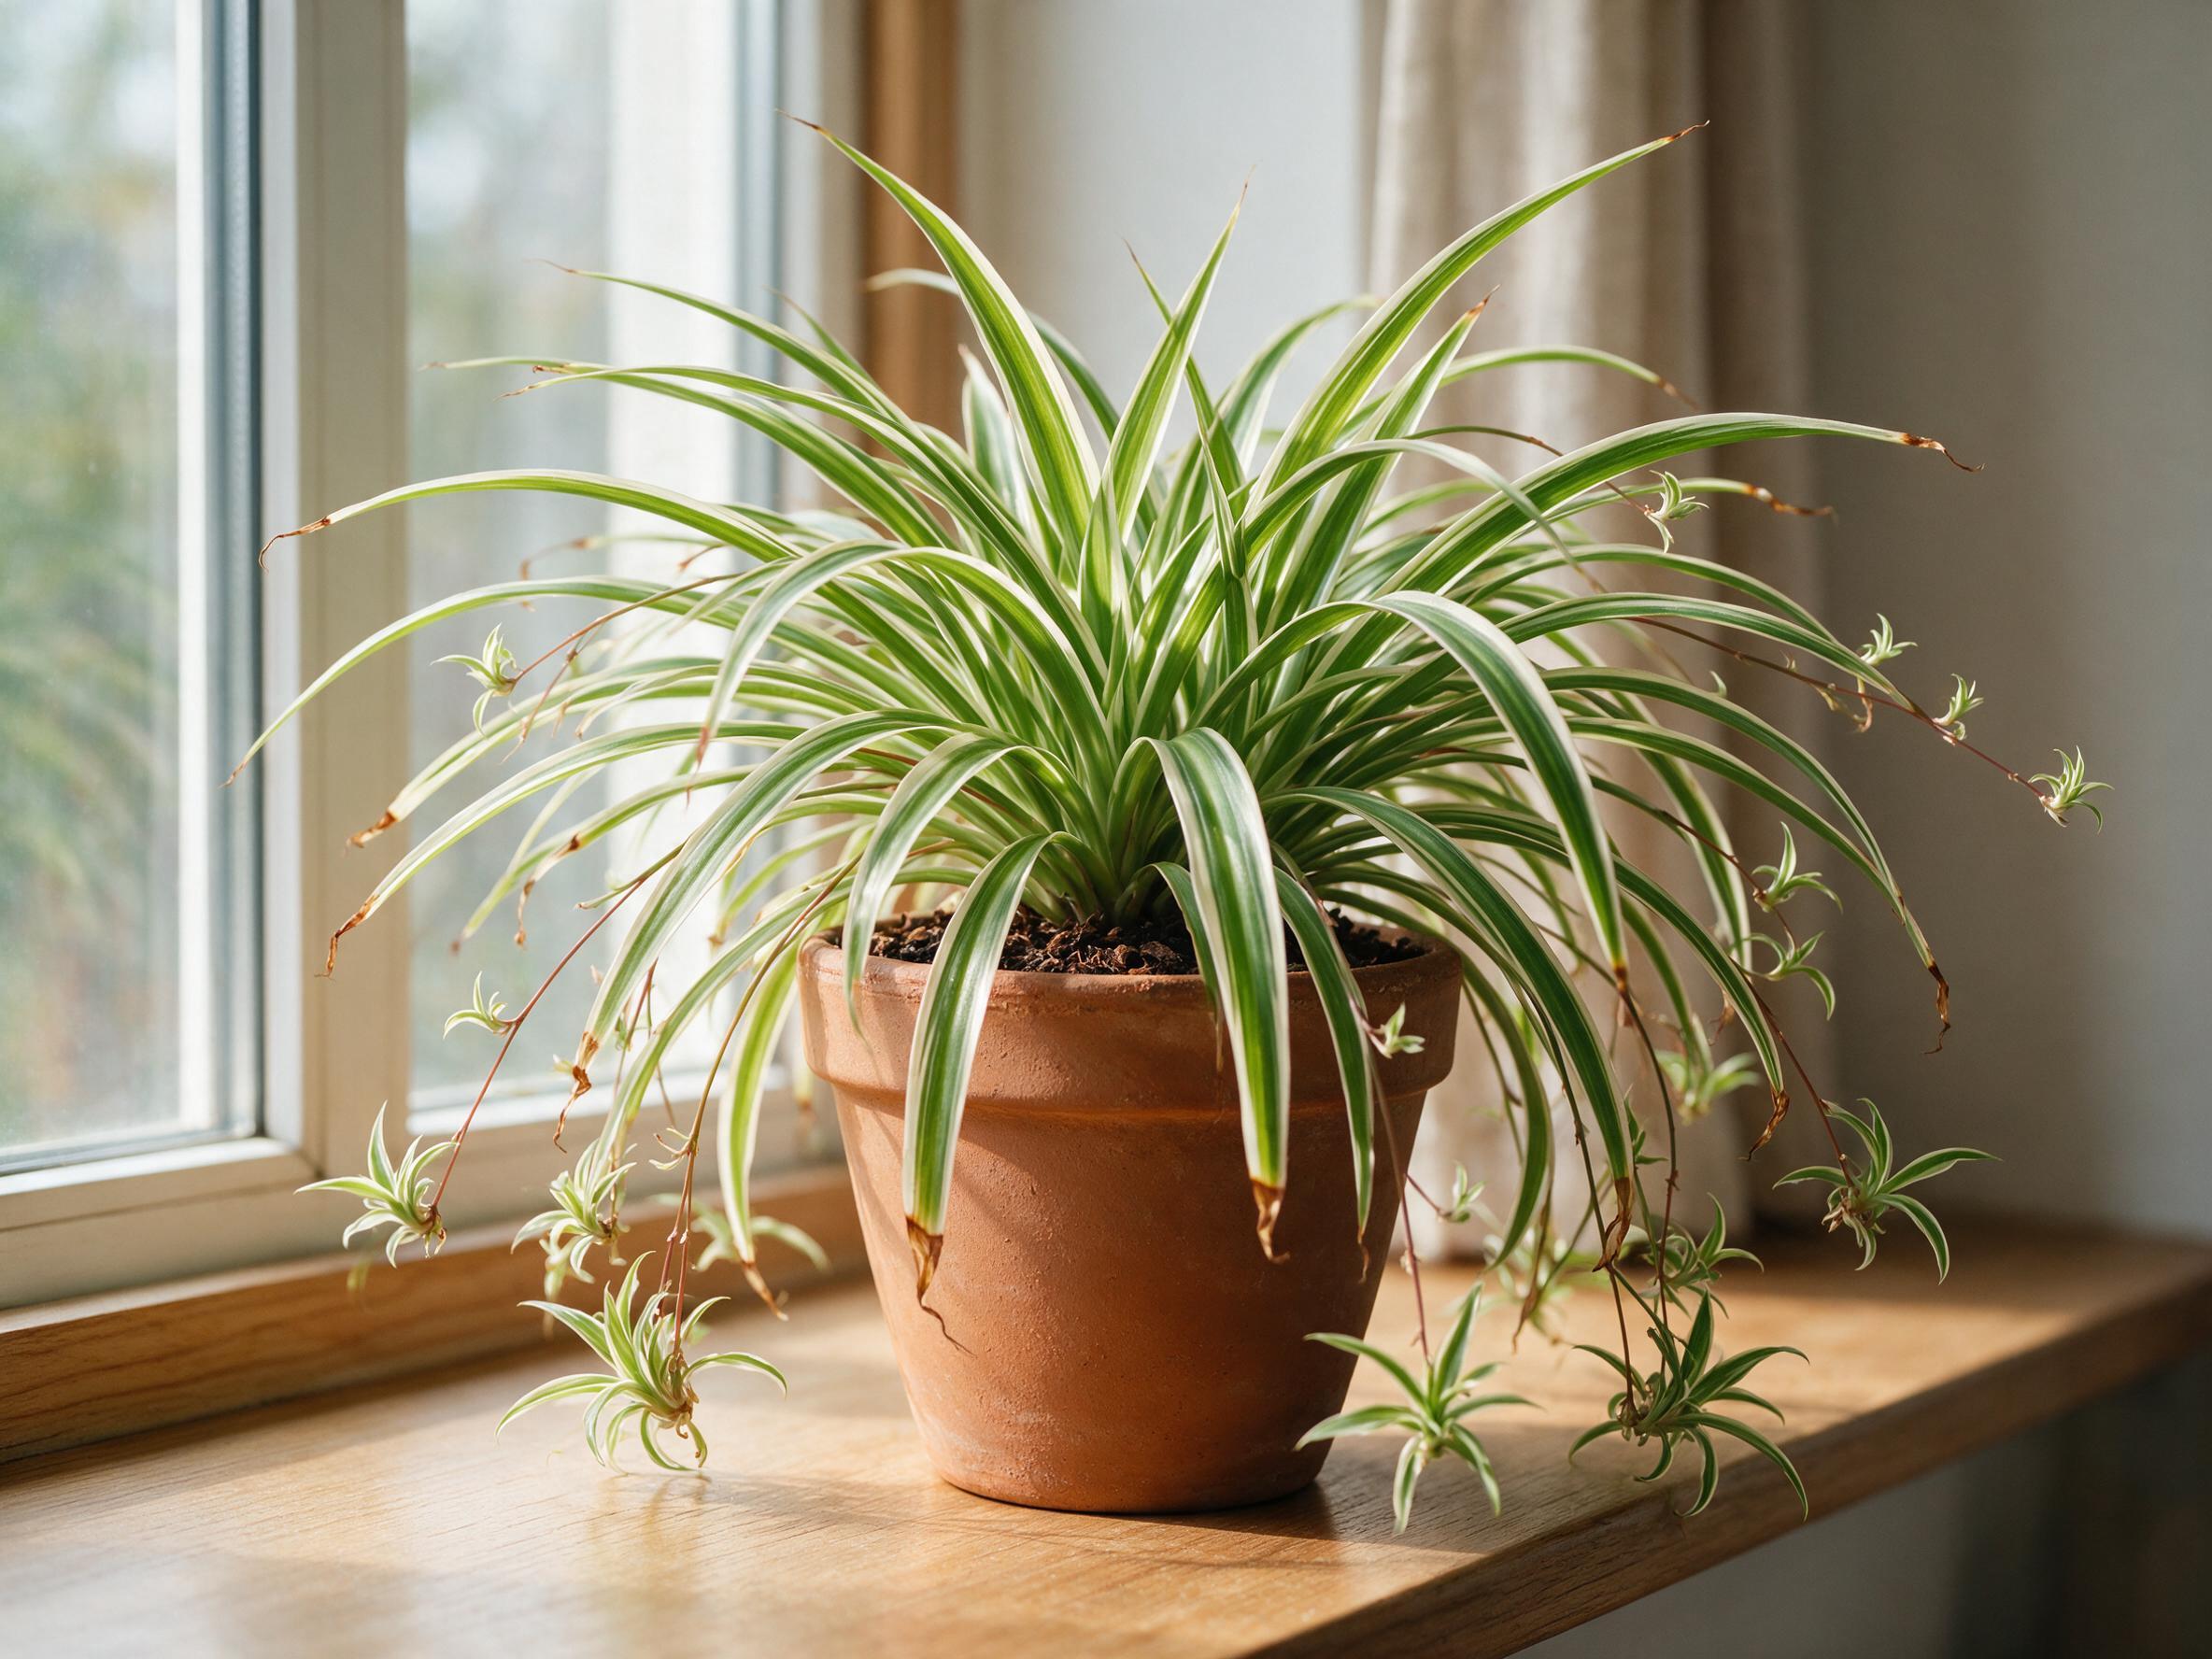
You glance at your spider plant and notice the leaf tips have gone crispy and brown — and suddenly your once-thriving plant looks a little worse for wear. Spider plants are beloved for their low-maintenance care and rapid growth, with long arching leaves and cascading offshoots, yet even these resilient plants can experience issues — and brown tips on their leaves are one of the most common. The good news? You are almost certainly not dealing with a dying plant.
Leaf tips often start browning because of a few common issues, usually tied to moisture, stress, or too much sunlight — and all of these problems are easy to correct. This guide walks you through every possible cause, a simple diagnosis method, and step-by-step fixes so your spider plant can get back to looking its best.
What Does It Mean When Your Spider Plant Has Brown Tips?
When your spider plant has brown tips, it is trying to tell you something. One of the most classic houseplants, spider plants are relatively trouble-free with few special needs — so when spider plant tips are brown, the most likely causes are cultural and environmental.
Brown tips are essentially a distress signal. The tips of the leaves are the furthest point from the roots, which means they are the first part of the plant to suffer when something is off with water uptake, humidity, or soil chemistry. The brown tip might be small or extend along the length of the leaf, and in severe situations, brown tips can spread from one leaf to the next, making the entire plant appear ill.
The texture and pattern of the browning give you useful clues. Crispy, dry tips usually point to a moisture or humidity issue. Soft, mushy browning near the base suggests overwatering or root rot. Browning that starts as pale spots and darkens progressively is more likely a disease issue. Keeping these distinctions in mind will make diagnosis much faster.
Pro Tip: Brown leaf tips will not turn green again once the tissue has died. Focus your energy on fixing the underlying cause so that new growth comes in healthy, then trim the affected tips for a tidy appearance.
Is Brown Tipping in Spider Plants Always a Sign of a Problem?
Not always. A few older leaves developing brown tips while newer leaves remain healthy is a normal part of the plant’s life cycle and is not a cause for concern. As your spider plant matures, some of its oldest leaves naturally deteriorate and can be trimmed away without any worry.
The distinction to watch for is scale and pattern. If only one or two older, lower leaves show a small amount of browning at the very tip and the rest of the plant looks lush and green, you are likely just seeing natural leaf aging. If you are wondering why your spider plant leaves are turning brown, it does not necessarily mean it is dying or on its way out — knowing the causes of brown leaves and preventing them is key to successfully reviving your plant.
On the other hand, if the browning is spreading rapidly, affecting new growth, or appearing alongside other symptoms like yellowing leaves, limp stems, or foul-smelling soil, that is a clear sign something needs your attention. Check through the causes below to narrow it down.
Watering Issues Causing Spider Plant Brown Tips
Improper watering is a common cause of browning foliage. Water stress is one of the most common causes of brown leaf tips on spider plants, and it can result from both overwatering and underwatering. With overwatering, excess moisture leads to root rot, which blocks the movement of water and nutrients through the plant.
Overwatering
Although browning on houseplants tends to be associated with underwatering, a lot of the time it is actually caused by the opposite. Consistent overwatering and soggy soil can lead your spider plant to develop root rot, a serious problem. As the roots die off, the plant becomes unable to take up water and the necessary nutrients to survive, and in the early stages, this can present as brown leaf tips.
Signs of overwatering include yellowing leaves, mushy roots, and foul-smelling soil. If your spider plant shows signs of overwatering, take a break from watering and allow the soil to dry out completely before resuming. If the problem is more severe — such as when the roots have started to rot with a foul odor — you will need to remove the plant from its pot, trim off damaged roots, and repot in fresh potting soil. Then reassess your watering schedule and consider reducing both the frequency and amount of water.
Underwatering
Underwatering can also be detrimental. If your spider plant is not watered frequently enough or if the soil dries out too much, the plant will start to dehydrate. When the plant lacks sufficient water, it struggles to maintain its hydration levels, leading to dry, crispy leaf tips.
The tips of the leaves are the first to show indications of browning because they are the furthest away from the roots. If your plant looks limp and the soil is bone dry, give it a thorough watering right away. Generally, you should water a spider plant when the top inch of soil feels dry to the touch — this usually means watering approximately once a week, but it may be less frequent during the winter months when the plant’s growth slows down.
Tap Water and Fluoride Buildup
Tap water often contains fluoride and chlorine, which are beneficial for humans but potentially toxic to spider plants. These chemicals can accumulate in the plant’s soil over time, damaging the roots and causing brown leaf tips. According to Ohio Tropics , Michigan State University confirms that spider plants are susceptible to fluoride toxicity in tap water. Although fluoride in tap water is useful for deterring tooth decay, excess fluoride can result in leaf tip burn, manifesting as brown areas both at the tip of the leaves and along the margins or edges.
A tell-tale sign of this issue is a white, crusty-looking layer on the soil surface or around the planter — mineral salts are building up and can start to affect your spider plant. Switch to distilled water, filtered water, or collected rainwater. It can also help to let tap water sit out for several hours or overnight to offgas some of the chlorine.
Pro Tip: You can find distilled water sold as CPAP water or ironing water at most US grocery and pharmacy chains — it works perfectly for watering fluoride-sensitive houseplants like spider plants.
Light Conditions Behind Spider Plant Brown Tips
Spider plants thrive in bright, indirect light. However, prolonged exposure to direct sunlight can cause their leaves to scorch, leading to brown, crispy edges. This is especially common if your plant is placed on a sunny windowsill.
These plants often grow as understory plants in the wild, where the canopy provides protection from hot, bright sunlight. In the home, situate the plant away from bright windows. Plants in southern or western windows may see the leaf ends brown as they scorch. The best light will be partial to full shade with diluted light.
If moving your plant is not practical, use sheer curtains to filter the light. On the other end of the spectrum, spider plants can also tolerate low light, though they may grow more slowly. For spaces with very limited natural light, consider using an LED grow light — these lights mimic the full spectrum of sunlight, giving your spider plant the energy it needs to thrive while producing less heat, which helps prevent leaf scorch. You can find more options in this guide to best houseplants for low-light areas if you are working with a challenging room.
Soil, Nutrients, and Root Health Causing Spider Plant Brown Tips
Fertilizer Burn and Salt Buildup
Be careful not to overdo it when it comes to fertilizer, as an overdose of plant food can actually be a cause of brown leaf tips on spider plants. It is called fertilizer burn and primarily affects the roots, which will begin to have trouble taking up water. Fertilizer burn often presents in the form of brown leaf tips in the initial stages as your spider plant starts to become thirsty and nutrient-starved.
Overfertilizing causes salt buildup that is toxic to plants, often resulting in brown tips. Once you see this happening, stop fertilizing immediately, as you do not want to cause more stress to your plant. You can pause fertilizing and flush the existing soil with water to wash away accumulated salts and restore balance. Spider plants only need fertilizing once every three months during the active growing season. Keep in mind that a houseplant only needs to be fertilized when it is actively growing — late spring through early fall.
Root Bound Conditions
This is common in potted spider plants where the container is too small for the roots. Spider plants with constricted roots have difficulty reaching the nutrients and water they require to survive, which can cause the plant to become stressed and grow brown tips on its leaves.
Check whether roots are poking out of the drainage holes or circling visibly at the soil surface. If your spider plant needs to be repotted desperately and is really root bound, it can be difficult to keep it hydrated enough, so giving it a bigger pot will be very helpful. Choose a pot that is one to two inches wider in diameter than the current one and use fresh, well-draining potting mix. You can also explore the many types of spider plants if you are thinking about adding variety to your collection.
Soil pH
Spider plants prefer slightly alkaline soil with a pH of 6.1 to 6.5, so using a pH meter to know if the soil is alkaline enough is a good practice. Soil that is too acidic can interfere with nutrient uptake and contribute to leaf tip browning over time. A simple soil pH test kit, available at most US garden centers, can confirm whether this is a factor.
Environmental Stress Triggering Spider Plant Brown Tips
Low Humidity
Spider plants are native to tropical regions, where they thrive in moderate to high humidity, ideally between 50% and 60%. When exposed to low humidity, spider plants may struggle to retain moisture, leading to dry, crispy leaf tips and the development of brown edges.
Dry, brown leaf tips appear especially in winter or near heating sources. Spider plants prefer moderate to high humidity levels, and if your home is too dry — particularly during winter when indoor heating is used — your plant may develop brown tips. This is an especially common issue in US homes with forced-air heating systems, which can drop indoor humidity well below comfortable levels for tropical plants.
To raise humidity, you have several practical options:
- Group your plants together to create a microclimate with increased humidity.
- Use a humidity tray — a shallow dish filled with pebbles and water — beneath the plant.
- Run a humidifier in the room, especially during winter months. Keep in mind that misting does not increase the humidity of your air — it will only wet your plant’s leaves.
- Move the plant to a naturally humid room like a bathroom or kitchen.
Temperature Fluctuations and Drafts
Sudden drops in temperatures or lighting conditions can put stress on your spider plant, causing brown or crispy leaf tips. To prevent browning leaves, keep your spider plant away from direct sunlight and maintain a consistent, moderate temperature. In addition, protect it from cold drafts, which can shock the plant.
Common culprits in US homes include air conditioning vents blowing directly on the plant in summer, heating vents doing the same in winter, and cold windowsills in northern states during the colder months. Keep your spider plant in a stable spot where temperatures stay between roughly 60°F and 80°F.
Pests and Disease Leading to Spider Plant Brown Tips
Aphids, whiteflies, and spider mites are the most common pests to harm a spider plant. Look for signs of foliage damage, webs, waste, or bugs to determine the type of pest. While spider plants are generally pest-resistant, stressed plants — particularly those already dealing with low humidity or inconsistent watering — are more vulnerable to infestation.
Common Pests
Spider mites are difficult to see because of their small size, but their feeding causes a mottled appearance on the leaves. These arachnids are closely related to spiders and ticks, are tiny and difficult to see, and live primarily on the undersides of leaves. Often, the best way to find them is to tap leaves over a piece of paper and look for tiny specks that move around. Spider mites prefer dry conditions and produce fine webbing on leaves and stems when populations are big enough.
Aphids usually hang out near the leaves, stems, or buds of your plants and leave a sticky residue behind called honeydew. Ants especially love to eat honeydew, so if ants are present, you probably have an aphid problem. Isolate any infested plants to prevent the pests from spreading to other houseplants.
For treatment, soap spray is one of the easiest and safest ways to kill soft-bodied pests like aphids, spider mites, and mealybugs — it works by breaking down their protective coating and drying them out. Neem oil is another effective option that works on a wide range of common houseplant pests. If you have cats sharing your home, check out these tips for keeping cats out of houseplants while you treat.
Disease
Diseases can cause various issues with the foliage. If your spider plant has brown tips and leaves turn black, it is usually a sign of bacterial leaf blight or root rot. Leaf blight often begins as pale spots on the leaf tips that darken to brown and eventually black. Bacterial leaf spot typically develops in overly hot, humid conditions.
Root rot leads to leaf collapse and can cause the plant’s base to become soft and mushy. To stop these diseases from spreading, avoid overhead watering and remove any affected leaves or damaged foliage. If the infection reaches the stems, the plant will not recover and must be discarded to prevent it from spreading to your other houseplants.
Spider plants generally stay disease-free, but they are susceptible to fungal leaf and root rot in certain conditions. Fungal problems usually arise from overly damp conditions, and overwatered plants without adequate drainage are more likely to experience fungal problems.
How to Diagnose Why Your Spider Plant Has Brown Tips
Working through the cause systematically saves time and prevents you from making unnecessary changes. Use this step-by-step approach:
- Check the soil first. Stick your finger an inch into the soil. Is it bone dry? Underwatering is likely. Is it soggy and has been wet for days? Overwatering or root rot may be the issue.
- Look at the browning pattern. Crispy, dry tips suggest low humidity, underwatering, or fluoride buildup. Soft or blackening tips suggest bacterial disease or root rot. Pale, scorched patches suggest too much direct sun.
- Assess the location. Is the plant near a heating vent, air conditioner, or a south-facing window with intense afternoon sun? Environmental stress is likely.
- Inspect for pests. Tap leaves over a piece of paper and look for tiny specks that move around — that is a sign of spider mites. Check leaf undersides for aphids, webbing, or sticky residue.
- Review your water source and fertilizer habits. If you use tap water and fertilize frequently, fluoride toxicity or fertilizer burn may be contributing. A white, crusty layer on the soil surface is a tell-tale sign of mineral salt buildup.
- Consider the season. If your spider plant’s brown tips appeared during the winter, it could likely be related to lack of humidity. Indoor heating dries out air quickly across much of the US in colder months.
If you want a tech-assisted approach to plant health, the best iPhone apps for identifying plants and best Android apps for identifying plants can also help you diagnose symptoms with photo recognition tools.
Pro Tip: More than one cause can be active at the same time. A plant sitting near a heating vent in a dry home that is also being watered with fluoride-heavy tap water may have three contributing factors. Address all of them together for the fastest recovery.
How to Fix a Spider Plant That Has Brown Tips
Once you have identified the cause, here is how to act on it:
For overwatering and root rot: Take the plant out of its container and cut off all afflicted root areas. Then repot into fresh soil, using a planter that has a drainage hole so excess water can flow out. To make sure this does not happen again, provide plenty of light and water only when the top inch or so of your spider plant’s soil has gone dry.
For underwatering: Give the plant a thorough watering right away. Then take a closer look at your watering routine to ensure the plant is getting enough moisture. The proper way to water a houseplant is thoroughly — always grow your spider plants in a pot with drainage holes, moisten all of the soil, and let excess water drain away.
For fluoride or salt buildup: Flush the excess fluoride from the plant’s soil by taking your spider plant outside and slowly pouring a large watering can full of rainwater or distilled water into the soil. Let it filter through the soil, out the bottom of the pot, and drain away. Repeat this two more times. Then switch permanently to filtered, distilled, or collected rainwater.
For fertilizer burn: The solution is flushing the soil. Flushing with distilled or rainwater can help leach out excess nutrients. If you need a more drastic solution, you can also repot your spider plant into fresh soil.
For trimming existing brown tips: Even after resolving the underlying issue, brown tips will not turn green again. To maintain a neat appearance, use clean, sharp scissors or pruning shears, sterilize the blades with rubbing alcohol or hot water to prevent infection, cut off the brown tips while following the natural shape of the leaf, and avoid cutting too close to the healthy green part to minimize stress on the plant.
How to Prevent Spider Plant Brown Tips Going Forward
Prevention is far easier than recovery. Building a consistent care routine around your spider plant’s actual needs will keep new growth coming in clean and green.
| Care Factor | Ideal Condition | Common US Mistake |
|---|---|---|
| Watering | Water when the top 1 inch of soil is dry; once weekly in growing season | Watering on a fixed schedule regardless of soil moisture |
| Water Type | Distilled, filtered, or rainwater | Straight fluoridated municipal tap water |
| Light | Bright, indirect light; north- or east-facing window | South or west window with direct afternoon sun |
| Humidity | 50–60% relative humidity | Forced-air heated rooms in winter (often below 30%) |
| Fertilizer | Diluted balanced fertilizer every 2–3 months during growing season | Fertilizing in fall and winter or using full-strength doses |
| Pot and Soil | Well-draining mix; pot with drainage holes; repot when root bound | Decorative pots with no drainage; compacted old soil |
| Temperature | 60°F–80°F; away from vents and cold drafts | Placed near AC or heating vents |
Monitor your houseplants frequently for pests and address them early while populations are small. Use multiple techniques for the best results. A quick weekly visual check — looking at leaf undersides, checking soil moisture, and scanning for unusual spots or webbing — takes less than a minute and catches problems before they escalate.
If you enjoy growing other low-maintenance houseplants alongside your spider plant, you might also find value in exploring different types of rubber plants or different types of aloe vera plants, which share many of the same care principles around drainage and indirect light. For outdoor spaces, consider pairing your indoor plant care knowledge with a look at drought-tolerant plants in Florida if you garden in a warm climate.
Frequently Asked Questions
Will brown tips on my spider plant turn green again?
Once your spider plant’s leaf tips turn brown, there is nothing you can do — the damage is already done. Simply trim the brown leaf tips off with a pair of sharp scissors. What you can do is focus on addressing the potential cause so that new growth will be free of brown tips.
Can I use tap water on my spider plant?
Even if your tap water is high in fluoride and other dissolved solids, you can still use it — you just have to take some extra measures. First, make sure you always have some distilled water handy. Alternatively, let tap water sit uncovered overnight before using it, which allows some of the chlorine to dissipate.
How often should I fertilize my spider plant?
Use a diluted fertilizer sparingly — no more than every 2–3 months. Always fertilize during the active growing season (spring through early fall) and hold off entirely during winter when the plant is not actively pushing new growth.
Should I cut all the brown tips off at once?
Yes, but do it carefully. You can cut the brown tips off your spider plant — trimming the browned ends can improve the appearance of your plant without harming it. Use clean, sharp scissors and cut just above the discolored area, following the natural shape of the leaf to maintain a more aesthetic look.
Can spider plants recover from root rot?
If the roots have started to rot with a foul odor, you will need to remove the plant from its pot, trim off the damaged roots, and repot the plant in fresh potting soil. Recovery is very possible if you catch root rot early — the key is removing all affected root tissue and improving drainage going forward. If the rot has reached the crown or stems, recovery is unlikely.
Are spider plants safe for pets?
Spider plants (Chlorophytum comosum) are generally considered non-toxic to dogs and cats, though they can have a mild hallucinogenic effect on cats that may encourage chewing. If your cat is nibbling on your plant, check out these plants that repel cats for companion planting ideas, or read up on how to keep cats out of houseplants for practical deterrents.
What is the white crust on my spider plant’s soil?
A white, crusty-looking layer on the soil surface or around the planter is a tell-tale sign that mineral salts are building up and can start to affect your spider plant. The fluoride can inhibit photosynthesis and causes those typical unsightly brown tips. Flush the soil thoroughly with distilled water and switch to a low-mineral water source going forward.