Orchid Roots Turning Brown? Here Is What Is Really Going On

September 14, 2026
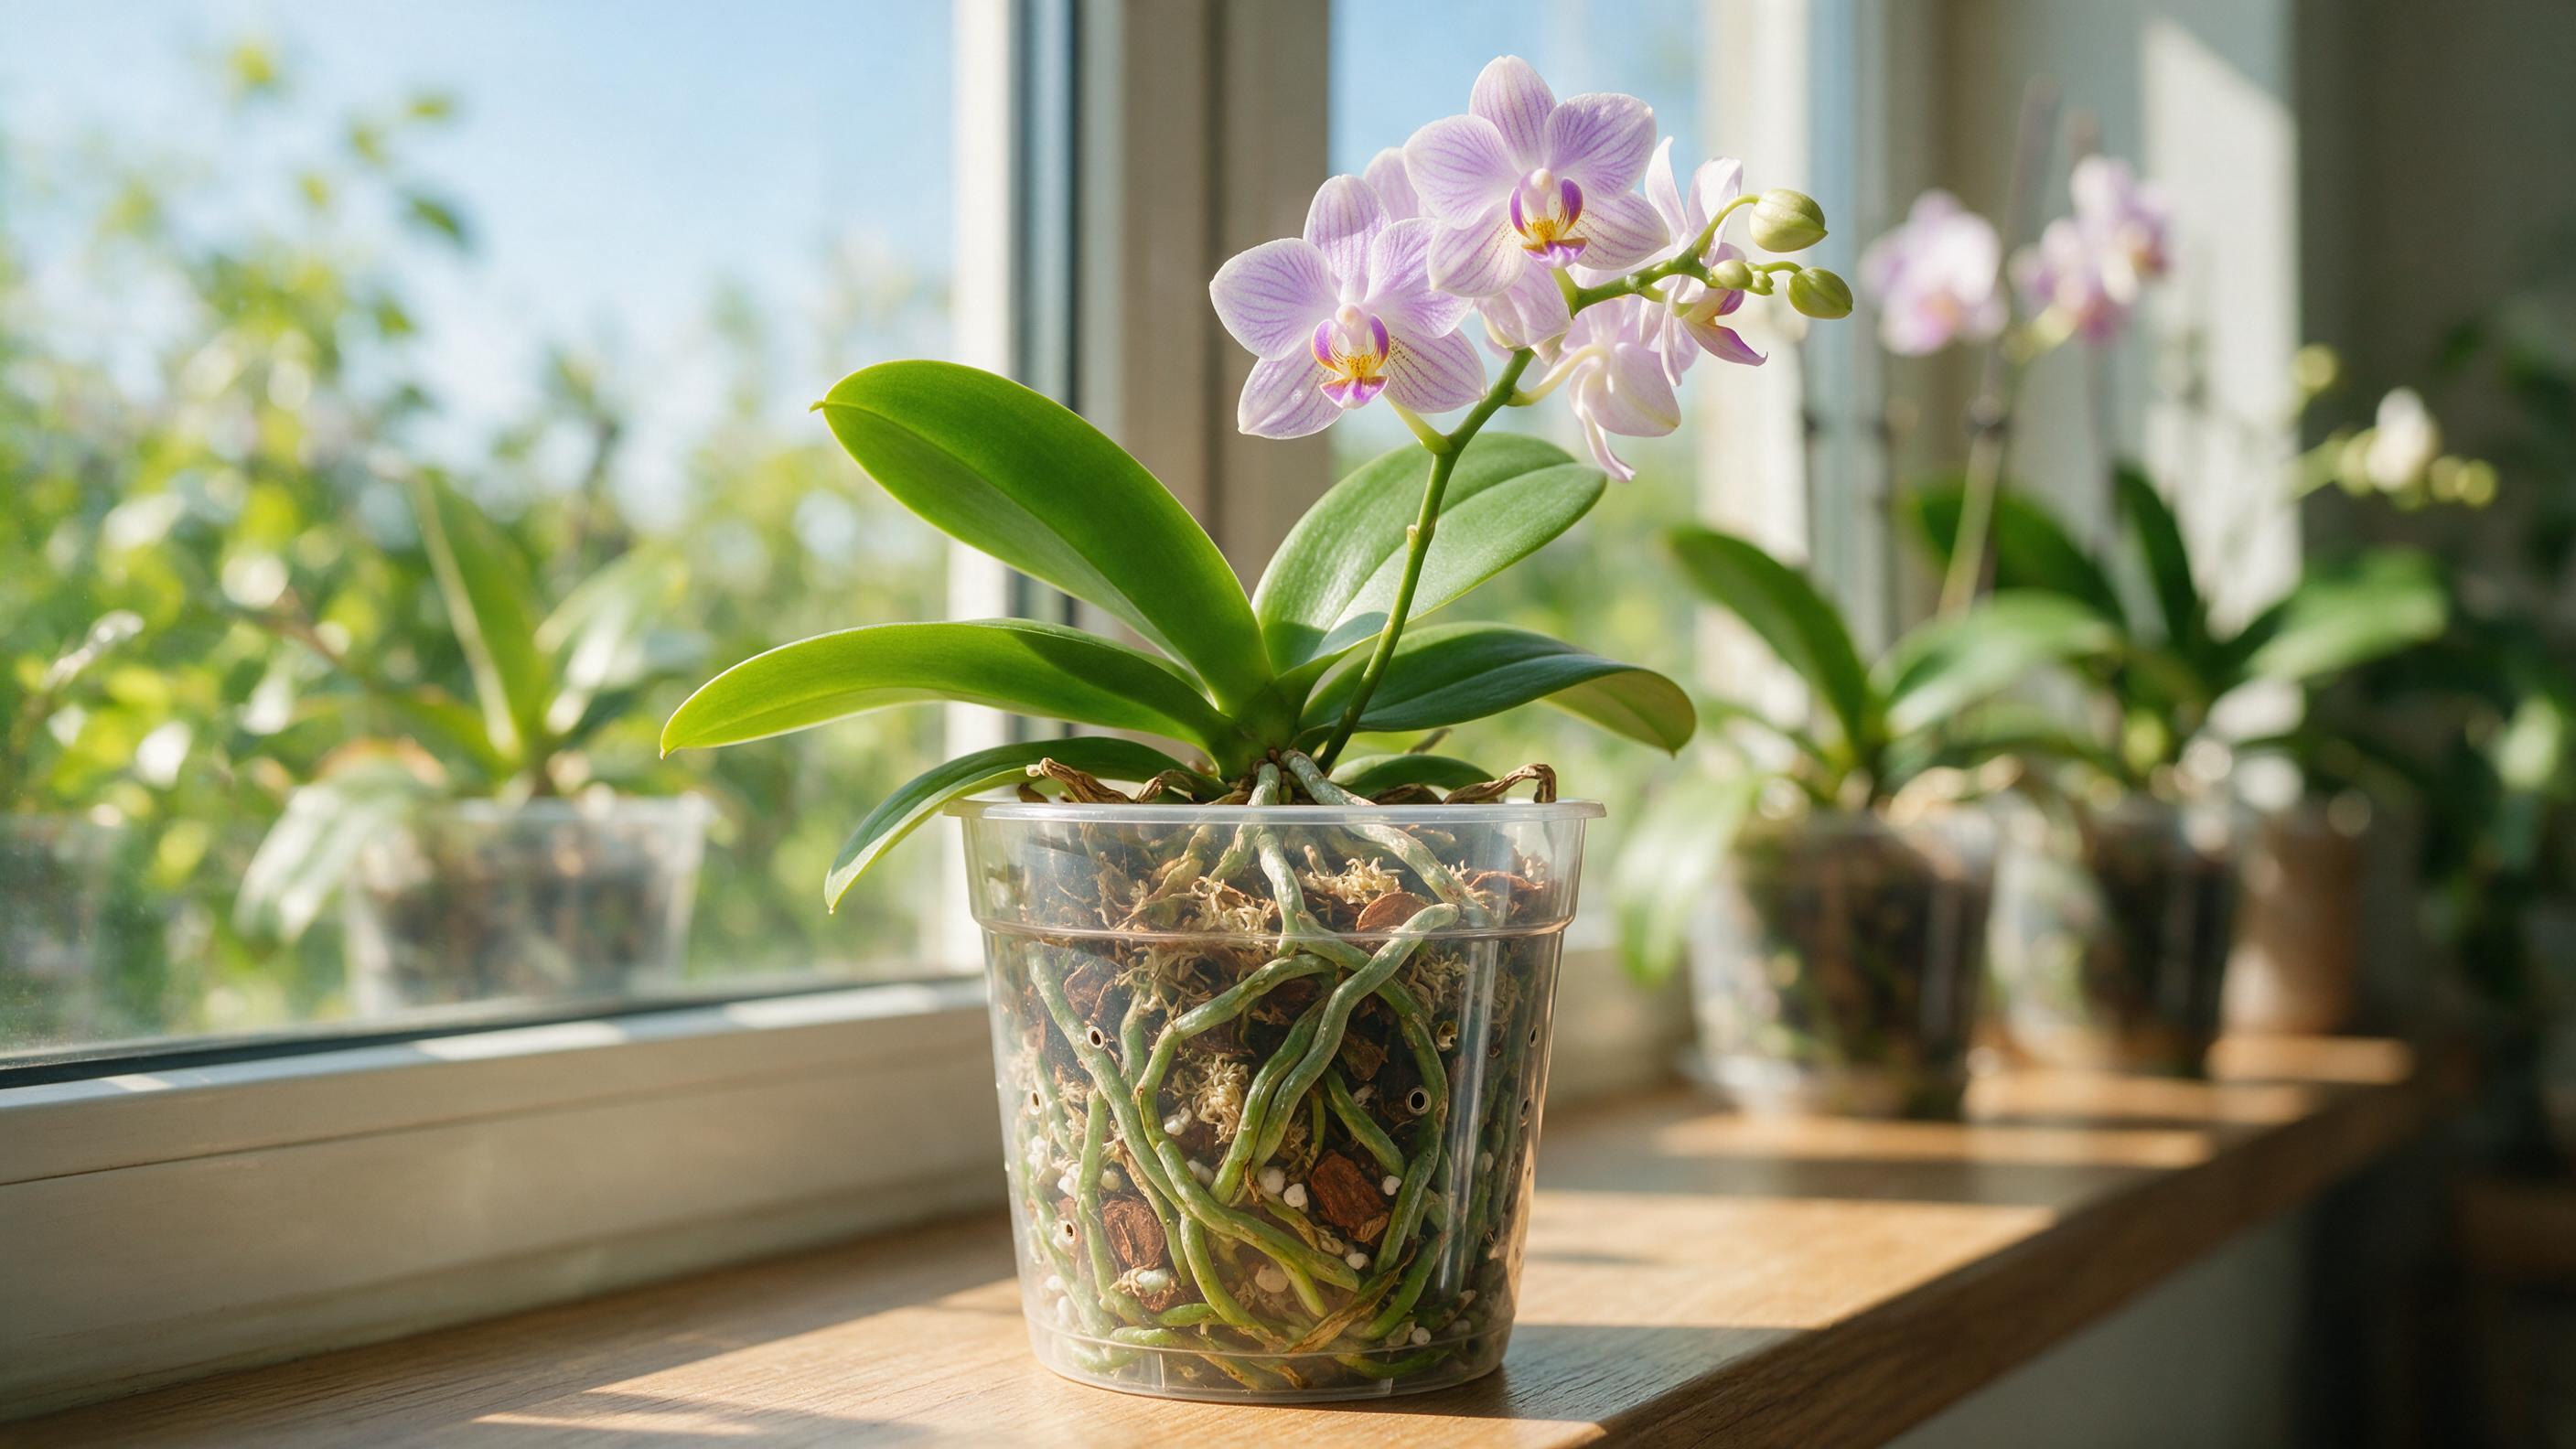
You peek through the clear walls of your orchid’s pot and notice the roots have gone from plump and green to brown, soft, or shriveled. It’s unsettling — and it happens to nearly every orchid grower at some point. The good news is that brown roots do not automatically mean a dead plant.
Orchids are unlike almost every other houseplant you might own. The most popular varieties kept in American homes, like the Phalaenopsis, are epiphytes — in their natural tropical habitats they grow clinging to tree bark rather than buried in soil. That unusual biology means their roots behave differently, respond differently to water, and can turn brown for a wider range of reasons than a standard potted plant. Understanding those reasons is the first step to fixing the problem and keeping your orchid healthy for years to come.
Pro Tip: Always use a clear plastic or glass pot for your orchid. Being able to see root color at a glance is the single easiest way to catch problems before they become serious.
What Does It Mean When Your Orchid Roots Are Turning Brown?
Brown roots on an orchid are a signal that something has changed — but the signal alone does not tell you the whole story. Healthy roots are plump, firm to the touch, and usually look silvery-gray when dry or bright green when freshly watered. Unhealthy brown roots are a clear sign of distress and, depending on the issue, might look shriveled, feel mushy or papery, and sometimes emit an earthy or sour odor.
The color and texture of the browning together tell you far more than color alone. Mushy, dark brown or black roots that smell off point toward rot caused by excess moisture. Dry, papery, hollow-feeling brown roots point toward dehydration. Crispy brown root tips with a white crust on the bark suggest fertilizer salt buildup. Each pattern has a different cause and a different fix, which is why diagnosing before treating matters so much.
To understand the root system of orchids in more depth, it helps to explore the different types of roots that plants develop and how they function.
Is Brown Color in Orchid Roots Always a Sign of a Problem?
Not always. Some browning is completely normal and does not require any intervention. Natural aging is part of an orchid’s life cycle. Older roots at the very center of the root ball will eventually die back naturally as the orchid focuses its energy on pushing out new, fresh roots near the top of the plant.
Orchids are always going through root growth and root death — that is just normal. Many growers who repot annually find brown, dry, brittle roots that need trimming. If the browning is limited to a few older interior roots while the outer and aerial roots remain plump and green or silver, you likely have nothing to worry about.
The situation becomes a genuine problem when browning is widespread, when roots feel mushy or hollow, when the discoloration is spreading, or when the leaves begin to droop, yellow, or wrinkle. During a healthy resting phase, roots should still look healthy — silver or green and firm to the touch. Some roots may naturally dry up or die, but most should remain in good condition if the plant is healthy.
Watering Issues Causing Orchid Root Browning
Watering problems are by far the most common reason orchid roots turn brown, and they can go in either direction — too much or too little.
Overwatering and root rot is the number one culprit. Overwatering and root rot is the top cause of brown, mushy roots. When orchids sit in soggy, broken-down potting media, the roots suffocate. This lack of oxygen leads to root rot — a fungal or bacterial condition that literally turns the roots to mush. Root rot caused by overwatering is the most common cause of death for cultivated orchids, because their roots are particularly sensitive to excess moisture.
An orchid about to experience root rot will often have dark green roots for a few weeks before the actual sickness occurs. The green color deepens further and eventually turns dark brown or black. Catching it at the dark-green stage gives you the best chance of saving the plant.
Underwatering produces a different kind of brown. If the roots are brown but feel dry, brittle, or hollow like empty paper straws, your plant is simply dehydrated. Severe lack of water causes the root tissue to die off. To distinguish root rot from underwatering, check the roots directly — underwatered orchids will have dry, brittle roots, while those with root rot will be mushy and slimy.
Overwatering can be caused by watering plants too frequently or allowing your plant to stand in water for more than 20 minutes. It can also result from the breakdown of the potting mix, which causes it to retain water and reduce air around the roots. Most indoor orchids need only to be watered once per week at the most, and they thrive on a bit of neglect in terms of watering.
Pro Tip: Use the skewer test before every watering. Insert a bamboo skewer gently into the potting mix, taking care to avoid the roots. Twist it a few times, then remove it — moisture marks on the skewer indicate how wet the medium still is at depth. If it comes out damp, wait another day or two.
Light Conditions Behind Orchid Root Browning
Light plays a more direct role in root health than most growers realize. Placement of your orchid in your home could be influencing root rot. The ideal place for an orchid is in a bright, warm location. If your orchid is hiding in a shady corner or basement, it’s almost guaranteed to develop a disease like root rot. Warm temperatures and light encourage the orchid to grow, which forces it to use more water. An orchid in a dark room will probably not extract all of the moisture from its soil between waterings.
Too little light keeps the potting medium perpetually damp between waterings, creating the wet, oxygen-depleted conditions that rot-causing fungi love. Too much direct sunlight, on the other hand, can scorch exposed aerial roots, causing dry, papery browning at the tips or along the length of the root.
For most Phalaenopsis orchids grown as houseplants in the US, a north- or east-facing windowsill provides the right balance — bright, indirect light without the intensity of afternoon sun. If natural light is limited in your home, choosing houseplants suited to low-light conditions can help you decide where your orchid will thrive. Full-spectrum LED grow lights are another reliable option for supplementing natural light indoors.
Soil, Nutrients, and Root Health Causing Orchid Root Browning
The potting medium and fertilizer routine you use have a direct effect on root color and condition.
In their natural habitat, orchids are tropical epiphytes that grow in trees with their roots exposed rather than in soil — they are essentially air plants. When cultivated, it can be difficult to give them enough support and moisture without some sort of potting media. Because they need excellent drainage and air circulation, a bark mix is typically used in place of regular potting soil, which better mimics the natural environment.
Over time, bark breaks down. Rotten roots may host diseases, but the prime cause is often growth media remaining wet for too long because it has broken down or has been watered too frequently. When the medium compacts and holds moisture, even a reasonable watering schedule can cause root rot. Repotting every 12–18 months resets the growing environment — old bark breaks down and retains mineral deposits even with regular flushing, while fresh bark restores drainage.
Fertilizer burn is another common cause of brown root tips. Feeding your orchid too much or using a fertilizer that is not properly diluted can cause mineral salts to build up in the potting mix. These salts can chemically burn the sensitive roots, turning the tips black or brown. The American Orchid Society describes the progression as: dead root tips, then brown roots, then brown leaf tips, then yellowing leaves, then plant death if untreated.
Hard tap water compounds the problem. Using water high in salts or excessive fertilization can build up toxic levels, damaging and discoloring roots. If your tap water visibly scales your faucets or kettle, switching to rainwater or distilled water for your orchid can make a noticeable difference. The American Orchid Society recommends flushing pots with fresh water at least monthly to prevent root damage from salt accumulation.
Pro Tip: Follow the “weakly, weekly” rule for fertilizing. Apply a half-strength solution every other watering during the growing season (spring and summer), and flush the pot thoroughly with plain water once a month to clear away salt buildup.
Environmental Stress Triggering Orchid Root Browning
Your home’s indoor environment — especially humidity and air circulation — affects orchid roots more than most growers expect.
The American Orchid Society puts the optimal humidity range for virtually all orchids at 40–70%. Most homes during winter run at 30–40%, right at the minimum, and forced-air heating drops it further. When humidity falls too low, roots dry out faster between waterings, aerial roots shrivel, and root tips can die back and turn brown.
Growing orchids inside, particularly where central AC or heat is used, dries the air out even more. A small ultrasonic humidifier placed within a couple of feet of your plant is the most reliable solution. Grouping plants together or placing the pot on a tray of pebbles and water also raises local humidity without wetting the roots directly.
Airflow is equally important for orchid health. Moving air carries moisture away from the plant’s roots, keeping them moist but not stagnant. A gentle oscillating fan running a few hours a day helps prevent the stagnant, humid conditions that invite fungal growth. Temperature extremes — cold drafts from windows in winter or heat vents blowing directly on the plant — can also stress roots and cause browning at the tips.
Most orchids grow best between 65–80°F during the day and 60–65°F at night. A nighttime dip of at least 10°F can also help trigger blooming in many species. Avoid placing your orchid near exterior doors, air conditioning vents, or drafty windowsills during cold months.
Pests and Disease Leading to Orchid Root Browning
When care conditions are correct but roots are still browning, pests or fungal disease may be the cause.
Fungal root rot pathogens are the most serious disease threat. Several types of fungi can cause disease in orchid roots, but the two most common culprits are Pythium and Phytophthora — essentially molds that thrive in warm, damp conditions. Rhizoctonia solani, another fungal pathogen responsible for brown rot, infects plants through the roots and progresses through the rhizome and pseudobulb, causing roots to die off and a brown rot that moves up slowly through the pseudobulbs.
Scale insects can also reach the root zone in severe infestations. According to the American Orchid Society , scale is probably the most important insect pest of cultivated orchids in northern climates, with at least 27 species identified from cultivated orchids. In extreme infestations, scale may develop on roots and rhizomes. The feeding damage and the honeydew they excrete create entry points for secondary fungal infections that brown and rot the roots.
Fungus gnats are a frequently overlooked pest in US homes. Adult fungus gnats are more annoying than damaging — it is their larvae that cause the real problem. The tiny white larvae live in the top layer of moist potting media and feed on organic matter, but they will also chew through young roots and root tips. For orchids in bark-based media, root damage from fungus gnat larvae can be severe enough to allow bacterial rot to enter through the wounds.
Although orchids are not naturally disease prone, over 100 diseases can attack them. Diseases of orchids are caused by bacteria, fungi, and viruses, and are classified as leaf spots; flower blights; and root, stem, and pseudobulb rots, which are the most serious. Isolating new plants for four to six weeks before adding them to your collection is one of the best defenses against introducing disease to a healthy orchid.
How to Diagnose Why Your Orchid Roots Are Turning Brown
Accurate diagnosis is what separates a successful fix from a wasted effort. Work through the following checklist before touching the roots.
- Check root texture first. To distinguish root rot from underwatering, check the roots directly — underwatered orchids will have dry, brittle roots, while those with root rot will be mushy and slimy. Mushy = excess moisture. Hollow and papery = dehydration.
- Smell the potting medium. A sour or foul odor coming from the bark is a strong indicator of root rot or bacterial decay. Fresh, healthy bark smells earthy and neutral.
- Look at the pattern of browning. Brown limited to the oldest, innermost roots with healthy outer roots = normal aging. Widespread browning of all roots = a care or disease problem. Brown only at root tips with a white crust on the bark = fertilizer salt burn.
- Inspect for pests. Go over every plant systematically. Check leaf axils, leaf undersides, pseudobulb bases, exposed roots, and the surface of the potting media. Use a magnifying glass — spider mites and early-stage scale are extremely difficult to see with the naked eye. Look for white fuzz (mealybugs), brown bumps (scale), fine webbing (spider mites), and sticky residue on leaves.
- Review your recent care history. Did you repot recently? Change your water source? Increase fertilizer? Move the plant to a darker or brighter spot? A change in care often precedes the first signs of root stress by two to four weeks.
- Assess light and humidity. A plant in a dark room with dry air is a root rot candidate even with correct watering, because the medium never dries out fast enough between waterings. Use a hygrometer to check whether humidity is staying above 40%.
If you want help identifying your orchid variety before diagnosing the problem, the best iPhone apps for identifying plants and best Android apps for identifying plants can give you a quick ID from a photo.
How to Fix an Orchid That Has Brown Roots
Once you have identified the cause, act promptly. Here is a step-by-step recovery process that addresses the most common scenarios.
Step 1: Unpot and inspect. Gently remove your orchid from its pot and massage the root ball to loosen and remove the old bark or moss. Rinse the entire root system under lukewarm, gentle running water. This washes away debris and helps you clearly see which roots are healthy (firm and green) and which are truly dead (mushy, smelly, or hollow).
Step 2: Trim dead roots with sterilized tools. Take a pair of sharp pruning shears or scissors and wipe the blades with rubbing alcohol first to sterilize them. Carefully snip away any roots that are brown, squishy, or papery. Be precise and try not to cut into firm, healthy tissue. Removing this dead material is crucial to stop the spread of rot.
Step 3: Treat the remaining roots. If you had to remove a lot of mushy roots due to root rot, you can lightly spray the remaining healthy roots with standard 3% household hydrogen peroxide. To give your orchid the best chance of recovery, treat the plant’s remaining roots with a fungicide. Ground cinnamon dusted on cut ends also acts as a natural antifungal agent.
Step 4: Repot in fresh medium. Ensure the orchid’s pot has good drainage holes. Consider repotting in a coarser, more breathable medium like bark or coarse perlite. Never reuse old potting bark — it may harbor the same pathogens that caused the problem. Avoid overpotting. A pot too large for the plant leads to overwatering because excess medium retains too much water. Match the size of the container to the plant’s rootball.
Step 5: Adjust your aftercare. After repotting, leave your orchid for a few days without watering, as the substrate will likely still be moist and the remaining roots will gather moisture from it. Resume a careful watering schedule once the medium has dried out. Hold off on fertilizing until new root growth appears.
For dehydrated roots specifically: If your plant’s roots are extremely brittle and snap or crumble when touched, your plant is severely underwatered. Give it a thorough watering immediately and spritz the roots regularly over the next week, followed by another full watering. You may be able to save the orchid if you act fast.
For pest-related browning: Isolate the plant immediately. Manually remove scale with a cotton ball soaked in a 50% isopropyl alcohol solution, being thorough and checking leaf nodes and crevices. For spider mites, isolate infected orchids and spray the plant with horticultural oil. After treating pests, repot in fresh medium and inspect roots for secondary rot.
Important Note: You cannot reverse root decay — you can only change the growing conditions of your orchid to encourage better new growth. Focus your energy on creating the right environment for recovery rather than trying to revive dead root tissue.
How to Prevent Orchid Root Browning Going Forward
Prevention is far easier than treatment. These habits, applied consistently, will keep your orchid’s roots healthy for the long term.
- Water by observation, not by schedule. Water when roots turn silver or white in color — that color change tells you the velamen layer is dry and the plant is ready for water. Never water simply because a certain number of days have passed.
- Use the right pot and medium. Containers without adequate drainage trap moisture around the roots, creating conditions ripe for rot. Always use a pot with drainage holes and a bark-based orchid mix, not regular potting soil.
- Repot on a regular cycle. Repotting every 12–18 months resets the growing environment before the bark breaks down to the point of holding excess moisture. Repot when new growth begins after the post-bloom dormant cycle or when the potting medium breaks down and drainage is impaired.
- Flush monthly. Flush pots with fresh water at least monthly to prevent root damage from salt accumulation. Run plain water through the medium until it drains freely from the bottom holes.
- Maintain humidity above 40%. A good humidifier in the room with your orchids is worth considering. All tropical plants thrive on humidity, as they are native to humid, tropical climates.
- Quarantine new plants. Always inspect new plants before introducing them to your collection and isolate them for at least six weeks to prevent spreading infestations.
- Sterilize your tools. Always sanitize pruning shears and other tools. Pass tools through a flame, wipe down with rubbing alcohol, or dip in a bleach solution (2 parts bleach to 10 parts water).
- Water in the morning. Always water your orchid in the morning. According to the American Orchid Society, this ensures that water will have evaporated from the foliage and crown by nightfall, reducing the risk of rot.
If you enjoy growing a range of houseplants alongside your orchids, exploring the many types of plants that thrive indoors can help you build a collection that complements your orchid care routine. For growers with pets, it is also worth knowing how to keep cats out of houseplants, since curious cats can knock orchids over and damage roots.
FAQ
Can Brown Orchid Roots Turn Green Again?
Roots that are brown due to dehydration can sometimes recover their plump, green appearance after a thorough watering and improved humidity. However, roots that are brown because of rot, fungal infection, or age cannot be revived. You cannot reverse root decay — you can only change the growing conditions to encourage healthy new growth. Trim dead roots cleanly and focus on supporting the healthy ones that remain.
How Often Should I Repot My Orchid to Prevent Root Problems?
Every one to two years, or when the potting mix breaks down, is the general recommendation — using a specialized orchid mix. If you notice the bark compacting, staying wet for more than a week after watering, or decomposing into a fine, soil-like texture, that is a sign to repot sooner regardless of the calendar.
Are Brown Aerial Roots a Problem?
Aerial roots — the ones growing outside the pot — are normal for epiphytic orchids. They naturally turn silvery-gray when dry, which is healthy. If aerial roots are shriveled, hollow, and papery brown, it usually indicates low humidity or underwatering. If they are mushy and dark brown, excess moisture is likely the cause. You can recognize if your orchid’s roots are standing in water by the color and structure of the aerial roots growing outside the pot.
Should I Cut Off All the Brown Roots?
Cut away brown roots with a sterile sharp knife and leave the green healthy roots as they are. If a root is firm and only slightly discolored at the tip, you can leave it — it may still be functioning. Only remove roots that are clearly mushy, hollow, or fully dead. The more healthy root mass you preserve, the faster your orchid will recover.
Can Too Much Fertilizer Cause Brown Roots?
Yes. Feeding your orchid too much or using a fertilizer that is not properly diluted can cause mineral salts to build up in the potting mix. These salts can chemically burn the sensitive roots, turning the tips black or brown. Always dilute orchid fertilizer to at least half the recommended strength and flush the pot with plain water monthly to prevent salt accumulation.
What Does a Healthy Orchid Root Look Like?
Phalaenopsis and Vanda roots store water in a thick outer layer called velamen. The sponge-like cells absorb water and vapor from the air until it is needed. When the velamen is full of water it looks green, then as it dries out it becomes silver. Firm, plump, and either green or silvery-white — that is what you are aiming for.