Why Is My Pothos Turning Brown? 7 Causes and How to Fix Them
March 10, 2026
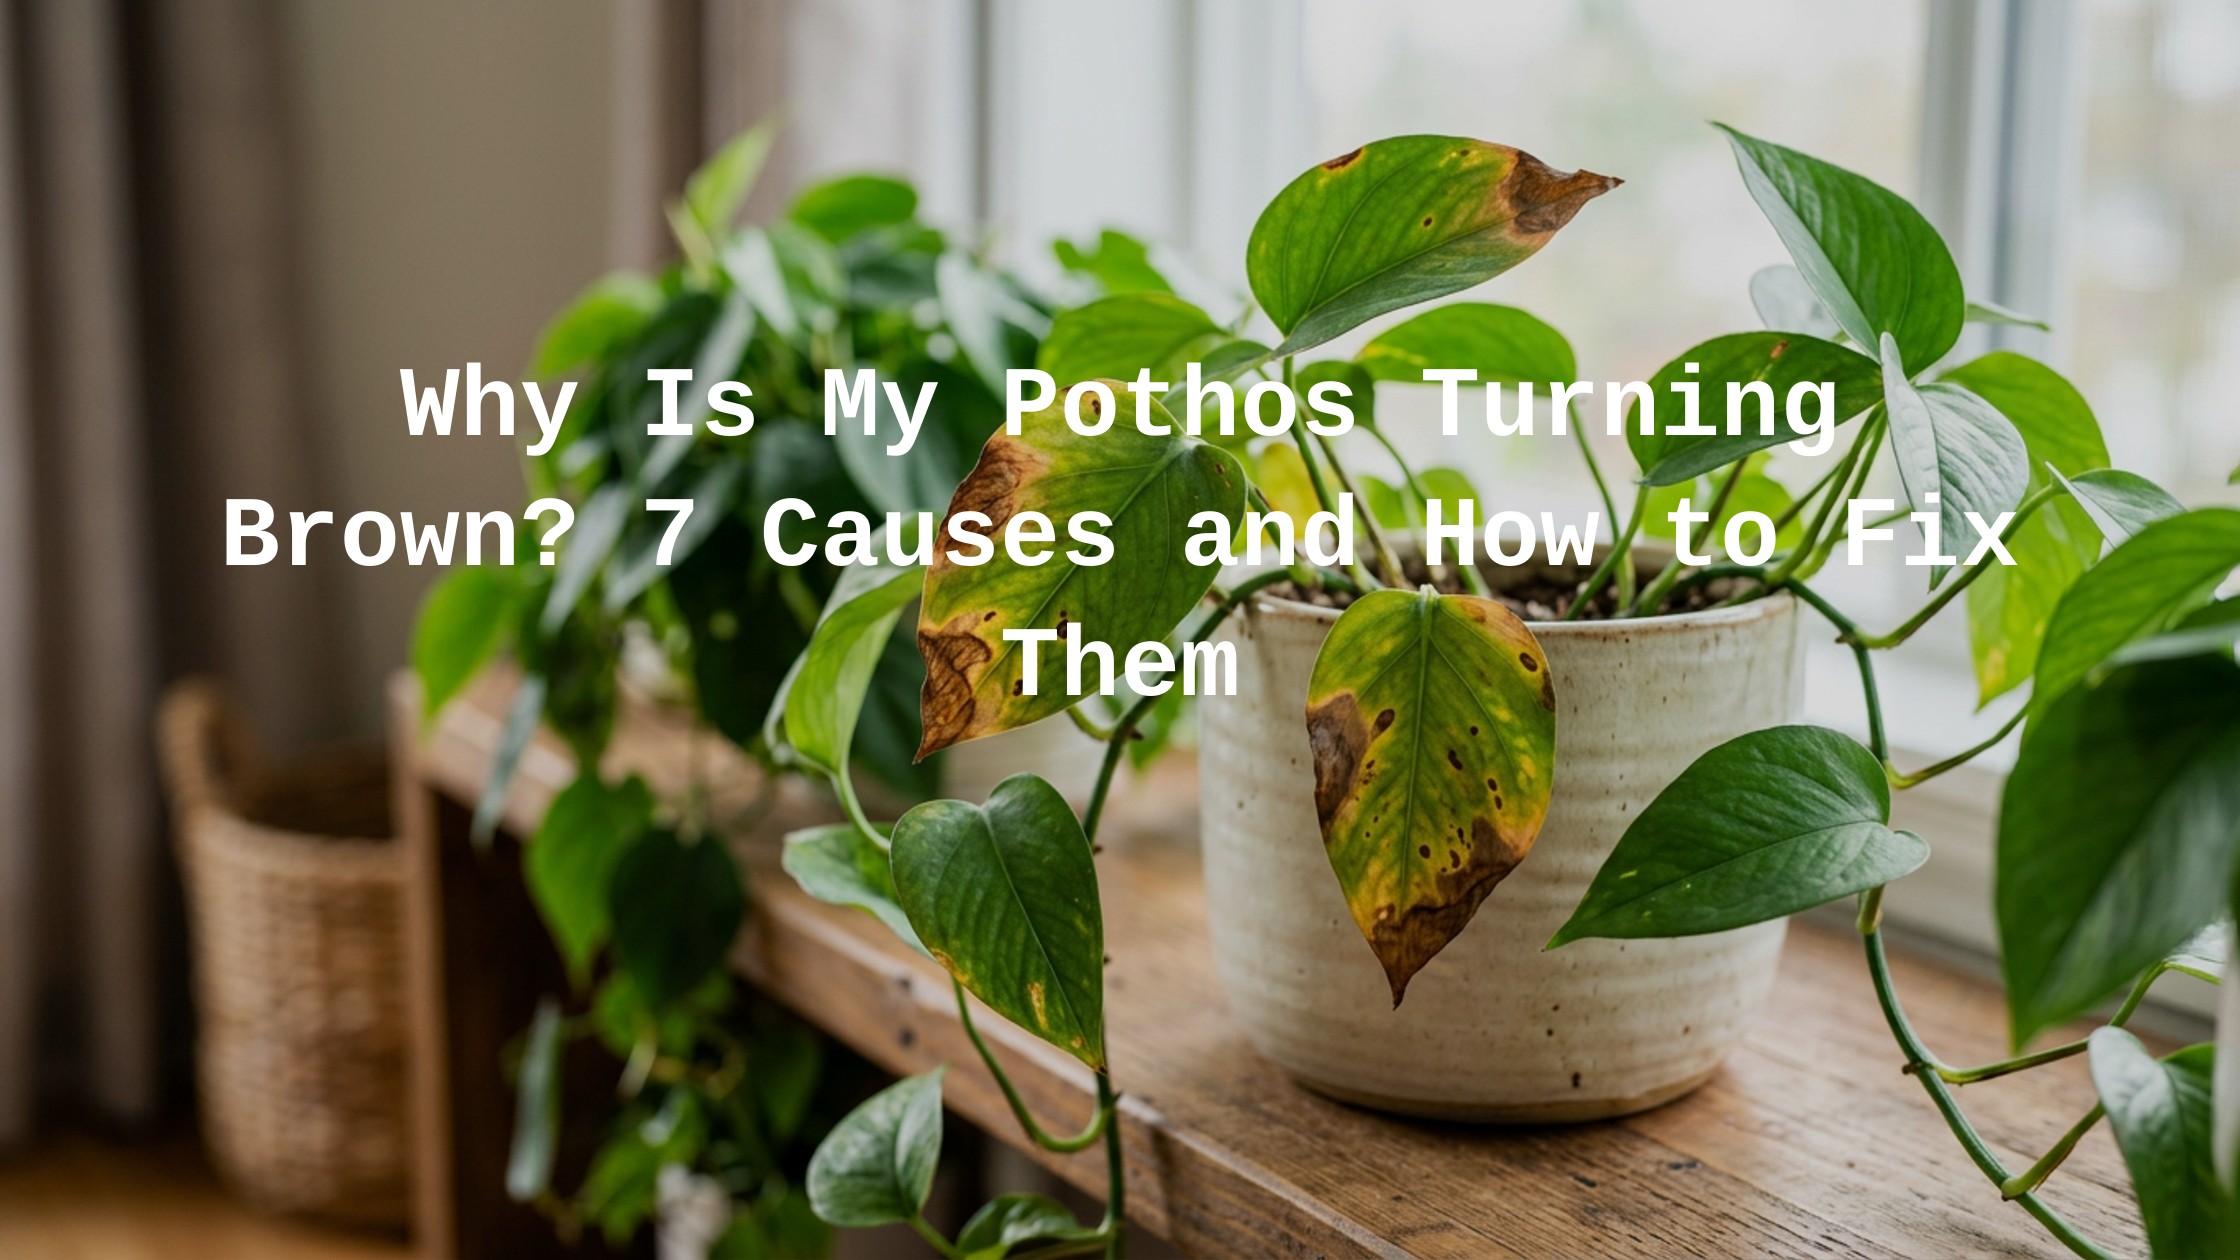
Browning leaves on a pothos can stop you mid-watering and send you straight to a spiral of plant-parent worry — but in most cases, there’s a straightforward explanation and a simple fix waiting for you.
Pothos are famously resilient houseplants, yet they do communicate stress through their foliage. Brown tips, brown spots, or fully brown leaves each tell a slightly different story, and learning to read those clues makes all the difference. This guide walks you through every likely cause, how to pinpoint the one affecting your plant, and exactly what to do about it.
Is It Serious?
The short answer: usually not. Pothos (Epipremnum aureum) are among the most forgiving houseplants you can own, and a few brown leaves rarely signal a crisis. That said, the pattern and speed of browning do matter when you’re trying to gauge urgency.
A single brown leaf tip here and there is almost always cosmetic — low humidity, a brief dry spell, or a minor environmental shift. If browning is spreading quickly across multiple leaves, appearing alongside yellowing, or the stems feel mushy, that warrants faster attention. Root rot, in particular, can move quickly if left unaddressed.
The good news is that even in more serious cases, pothos respond well to intervention. As long as healthy green growth remains on the plant, recovery is very much on the table. Take a breath, assess the clues below, and treat this as a diagnostic puzzle rather than a plant emergency.
Key Insight: Brown leaf tips affect appearance only and do not harm the plant’s overall health. Brown spots spreading across the leaf surface, however, are worth investigating promptly.
Common Reasons Your Pothos Is Turning Brown
Most browning issues trace back to one of seven core causes. Understanding each one — and what it looks like on the leaf — gives you a reliable starting point for diagnosis.
1. Overwatering
Overwatering is the single most common reason pothos develop brown leaves, and it often comes paired with yellowing. When roots sit in waterlogged soil for too long, they begin to rot, cutting off the plant’s ability to absorb nutrients and oxygen. The result is brown, mushy patches — often starting at the base of the leaf or spreading inward from edges.
Check the soil before you do anything else. If it feels wet several inches down and has been that way for days, overwatering is likely your culprit. A foul smell from the soil is a strong indicator of root rot already underway.
2. Underwatering
On the opposite end, a pothos that dries out too completely between waterings will develop crispy brown tips and edges. Unlike overwatering damage, which tends to look soft and discolored, underwatering produces dry, papery browning that starts at the leaf tips and moves inward.
The soil will feel bone dry several inches down, and the leaves may look slightly wilted or curled. This is one of the easier problems to reverse — a thorough, even watering usually brings the plant back within a day or two.
3. Low Humidity
Pothos are tropical plants at heart, and they prefer humidity levels between 50–70%. Most indoor environments — especially in winter when heating systems run constantly — drop well below that. Low humidity causes the leaf tips to dry out and turn brown, even when watering habits are perfectly on point.
If the browning is limited to the very tips of otherwise healthy-looking leaves, and your home feels dry, humidity is almost certainly the cause.
4. Too Much Direct Sunlight
Pothos thrive in low to medium indirect light, and direct sun exposure causes leaf scorch. Scorched leaves develop bleached or brown patches — often in the center of the leaf rather than at the edges — and the damage is irreversible on affected leaves.
If your pothos sits in a south- or west-facing window where afternoon sun hits the leaves directly, that’s a likely source of the problem.
5. Fluoride and Salt Buildup in Soil
Tap water contains fluoride and other minerals that accumulate in potting soil over time. This buildup creates a toxic salt concentration around the roots, which shows up as brown leaf tips — very similar in appearance to low humidity damage, but with a visible white crust on the soil surface or around drainage holes.
Fertilizer overuse contributes to the same problem. If you’ve been feeding your pothos frequently without flushing the soil, mineral buildup is worth considering.
6. Root Rot
Root rot is the most serious cause on this list and develops when overwatering persists long enough for fungal pathogens to take hold in the soil. Affected roots turn black and mushy, and the plant loses its ability to take up water and nutrients effectively. Brown, wilting leaves that don’t improve after watering are a classic sign.
Root rot requires hands-on intervention — you’ll need to unpot the plant, inspect the roots, and remove the damaged sections. The earlier you catch it, the better the outcome.
Important Note: Root rot can look deceptively similar to underwatering because the plant wilts and browns even though the soil is wet. Always check the soil moisture before adding more water.
7. Pests
Common houseplant pests like spider mites, mealybugs, and scale insects feed on pothos leaves and stems, causing brown spots, stippling, or patches of discoloration. Pest damage often looks irregular — scattered brown spots or speckles rather than uniform tip browning — and you may notice fine webbing, sticky residue, or tiny insects on the undersides of leaves.
Check the undersides of leaves carefully if browning appears alongside unusual textures or residue on the foliage.
How to Tell Which Cause Is Affecting Your Pothos
The location and appearance of the browning are your two most reliable diagnostic tools. Run through the questions below to narrow down the cause quickly.
Look at Where the Brown Appears
- Brown tips only → Low humidity, underwatering, or mineral/salt buildup
- Brown edges spreading inward → Underwatering, low humidity, or fertilizer burn
- Brown patches in the center of the leaf → Sunburn or pest damage
- Brown and mushy areas → Overwatering or root rot
- Scattered brown spots or speckles → Pest activity or fungal infection
- Entire leaves turning brown and wilting → Root rot or severe underwatering
Check the Soil and Roots
Push your finger two to three inches into the soil. Wet and compacted soil points toward overwatering. Completely dry, pulling-away-from-pot-edges soil points toward underwatering. If the soil smells sour or earthy in an unpleasant way, root rot may already be present. For a definitive check, gently remove the plant from its pot and look at the roots — healthy roots are white or light tan and firm, while rotted roots are dark brown or black and soft.
Assess the Environment
Think about recent changes: Did you move the plant closer to a window? Did the heating system kick on for the season? Have you been fertilizing more frequently? Environmental shifts are often the trigger for sudden browning that wasn’t present before.
Pro Tip: Take a photo of the affected leaves and compare the pattern to the list above. Visual matching is often faster and more accurate than trying to recall watering schedules from memory.
Quick Diagnostic Reference
| Symptom | Most Likely Cause | Secondary Check |
|---|---|---|
| Crispy brown tips | Low humidity or underwatering | Check soil moisture and room humidity |
| Brown and yellow leaves | Overwatering | Check soil — is it consistently wet? |
| Bleached brown patches | Direct sunlight / leaf scorch | Check window exposure |
| Mushy brown stems or leaves | Root rot | Inspect roots after unpotting |
| Scattered brown spots | Pests or fungal issue | Inspect leaf undersides |
| White crust on soil + brown tips | Mineral/salt buildup | Review water type and fertilizer use |
| Brown with wilting, dry soil | Underwatering | Water thoroughly and observe |
How to Fix It
Once you’ve identified the cause, the fix is usually straightforward. Here’s what to do for each scenario.
Fix Overwatering
- Stop watering immediately and move the plant to a spot with good airflow.
- Allow the soil to dry out completely before watering again.
- If the pot lacks drainage holes, repot into one that has them.
- Going forward, water only when the top two inches of soil are dry to the touch.
Fix Root Rot
- Unpot the plant gently and shake off as much soil as possible.
- Rinse the roots under lukewarm water and inspect them carefully.
- Use clean, sterilized scissors to remove all black or mushy root sections.
- Let the roots air-dry for 30–60 minutes, then repot in fresh, well-draining potting mix.
- Hold off on watering for 48 hours to allow any cut root ends to callous over.
Fix Underwatering
Give the plant a thorough bottom-up watering by placing the pot in a shallow tray of water for 20–30 minutes, allowing the soil to absorb moisture evenly from the bottom up. Once the top of the soil feels moist, remove the pot and let it drain. Crispy brown tips won’t reverse — but new growth will come in healthy, and existing leaves will stop worsening.
Fix Low Humidity
Group your pothos with other houseplants to create a natural humidity microclimate, or place a small humidifier nearby. A pebble tray filled with water and set beneath the pot is a low-effort option that raises local humidity around the plant. Misting can help short-term but evaporates quickly and isn’t a reliable long-term fix.
Fix Sunburn
Move the plant away from direct sun exposure. Pothos do well in bright, indirect light or even in lower light conditions — a spot several feet from a bright window is usually ideal. Scorched leaves won’t recover, but you can trim them once the plant has been relocated and is no longer stressed.
Fix Mineral and Salt Buildup
Flush the soil by watering slowly and thoroughly until water runs freely from the drainage holes — repeat this two or three times in one session to push accumulated salts out of the root zone. Switching to filtered water or leaving tap water out overnight before use can reduce ongoing buildup. Cut back on fertilizing frequency if you’ve been feeding more than once a month during the growing season.
Fix Pest Infestations
Isolate the affected plant immediately to prevent spreading to nearby plants. Wipe down all leaf surfaces — including undersides — with a damp cloth or cotton ball dipped in diluted isopropyl alcohol. For heavier infestations, apply neem oil or insecticidal soap, following label instructions. University extension resources on houseplant pest management offer detailed guidance on identifying and treating specific pest species. Repeat treatments every five to seven days for two to three weeks to break the pest life cycle.
Common Mistake: Trimming brown leaves without addressing the root cause. Removing damaged foliage improves appearance, but if the underlying issue isn’t fixed, new leaves will continue to brown.
How to Prevent It
Most pothos browning issues are preventable with a few consistent habits. These practices address the most common triggers before they become visible problems.
- Water on a schedule based on soil, not the calendar. Check the top two inches of soil before every watering. If it’s still moist, wait. This single habit prevents both overwatering and underwatering.
- Use well-draining potting mix and pots with drainage holes. Soggy soil is the gateway to root rot. A mix designed for tropical houseplants — or a standard potting mix amended with perlite — keeps roots healthy and aerated.
- Maintain consistent humidity above 40%. A basic hygrometer (available for under $15) lets you monitor your indoor humidity year-round so you can intervene before the leaves show stress.
- Keep the plant in bright, indirect light. Avoid placing pothos in direct sun, especially during afternoon hours. A north- or east-facing window, or a spot set back from a bright south-facing window, works well.
- Flush the soil every two to three months. Regular flushing prevents mineral and salt accumulation, especially if you use tap water or fertilize regularly.
- Inspect leaves monthly for pests. A quick check of leaf undersides during your regular care routine catches infestations early, when they’re much easier to manage. Knowing the most common houseplant pests helps you identify problems before they escalate.
- Repot every one to two years. Fresh potting mix reduces salt buildup and gives roots room to grow, reducing overall stress on the plant.
Pro Tip: Keep a simple plant journal — even just notes in your phone — recording when you water, fertilize, and notice any changes. Patterns become much easier to spot when you have a record to reference.
Pothos Quick Care Guide
Whether you’re new to pothos or just want a reliable reference, this snapshot covers everything your plant needs to stay healthy and green. For a deeper look at the full range of varieties available, the different types of pothos plants guide covers the most popular cultivars and their individual quirks.
| Care Factor | Ideal Conditions | Notes |
|---|---|---|
| Light | Bright to medium indirect light | Tolerates low light; avoid direct sun |
| Watering | When top 2 inches of soil are dry | Roughly every 7–10 days; adjust by season |
| Humidity | 50–70% preferred; tolerates 40%+ | Use humidifier or pebble tray in dry months |
| Temperature | 65–85°F (18–29°C) | Keep away from cold drafts and AC vents |
| Soil | Well-draining tropical potting mix | Add perlite to standard mix if needed |
| Fertilizer | Balanced liquid fertilizer monthly | Growing season only (spring–summer); none in winter |
| Repotting | Every 1–2 years | Move up one pot size when roots circle the bottom |
| Toxicity | Toxic to cats and dogs | Keep out of reach of pets; tips for keeping cats away from houseplants can help |
Pothos are genuinely one of the easiest houseplants to keep happy long-term. A full overview of pothos care and growing habits is a great resource to bookmark alongside this guide. If you enjoy the low-maintenance appeal of pothos, you might also appreciate other houseplants that thrive in low-light areas — many of them share similar care requirements.
Key Insight: Pothos are one of the few houseplants that genuinely adapt to a wide range of conditions. The goal isn’t perfection — it’s consistency. Stable light, appropriate watering, and decent humidity cover 90% of what this plant needs.
Frequently Asked Questions
Yes — but only after you’ve addressed the underlying cause. Removing brown leaves improves the plant’s appearance and redirects energy toward healthy growth, but trimming without fixing the problem means new leaves will continue to brown. Use clean, sharp scissors and cut at the base of the stem or just above a node.
No. Once a leaf has turned brown, that tissue is dead and won’t recover its green color. However, stopping the cause of browning will prevent further damage, and the plant will produce new, healthy green leaves as it recovers. Trim away brown sections for a tidier appearance if you prefer.
There’s no universal schedule — it depends on your pot size, soil type, light levels, and season. A reliable rule of thumb is to water when the top two inches of soil feel dry. In most homes, this works out to roughly every seven to ten days in summer and every ten to fourteen days in winter. Always check the soil rather than following a fixed calendar.
Brown tips specifically — without browning on the rest of the leaf — almost always point to low humidity, underwatering, or mineral buildup from tap water. Check your room’s humidity level with a hygrometer, review your watering frequency, and consider switching to filtered water if you use tap water regularly.
Almost certainly not. A few brown leaves are a normal part of a pothos plant’s life, especially as older lower leaves age out. If the majority of the plant looks healthy and is still producing new growth, you’re in good shape. Focus your attention on the cause of browning rather than the browning itself, and your plant will be fine. For more context on general pothos health and behavior, the pothos houseplant guide is a helpful reference.
Yes, as long as healthy stem sections with nodes are available. Choose a stem with at least one or two healthy green leaves, cut just below a node, and place it in water or moist soil. The brown leaves on the parent plant don’t affect the viability of cuttings taken from healthy sections. If you’re exploring other easy-to-propagate houseplants, the guide to types of plants offers a broad look at what’s available for indoor growing.